Quantcast
Channel: Hortonworks » Knowledgebase
Viewing all 31 articles
Browse latest View live

HOW TO: Connect Tableau to Hortonworks Sandbox

$
0
0

Tableau, Apache Hive and the Hortonworks Sandbox

As with most BI tools Tableau can use Apache Hive (via ODBC connection) as the defacto standard for SQL access in Hadoop. Establishing a connection from Tableau to Hadoop and the Hortonworks Sandbox is fairly straightforward and we will describe the process here.

1. Install Tableau

To get started, please download and install Tableau from their web site at www.tableau.com. Tableau is a Windows only application.

2. Install & Configure Windows 32bit ODBC driver

Once Tableau is installed you will need to go to the Hortonworks web site and download the Windows 32bit ODBC driver at http://hortonworks.com/thankyou-hdp12/#addon-table.

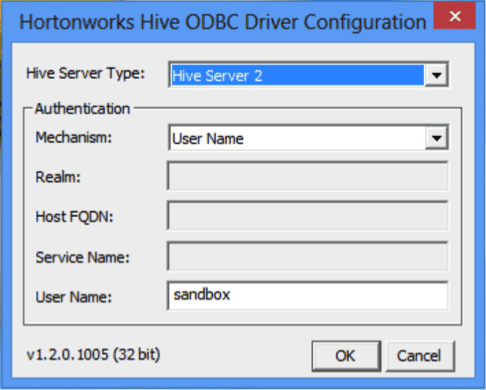
Once the driver is installed you need to configure the driver by executing the  DriverConfiguration32.exe utility. You can find it from the Start menu or you can search for it from the Start page.  Configure the Hive Server type to 2 and then set Authentication Mechanism to “User Name” and the User Name to “sandbox”.

t01

3. Connect to Hadoop as Data Source

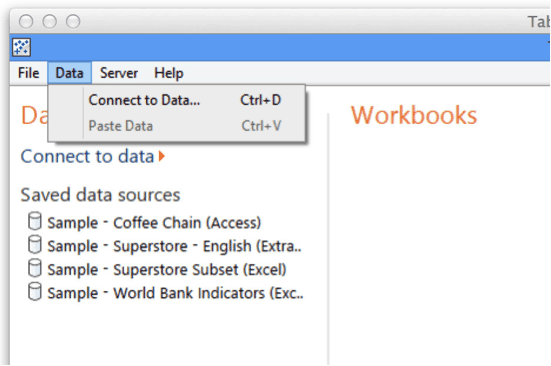
Start the Tableau application and choose the Select Connect to Data from the Data Menu.

t02

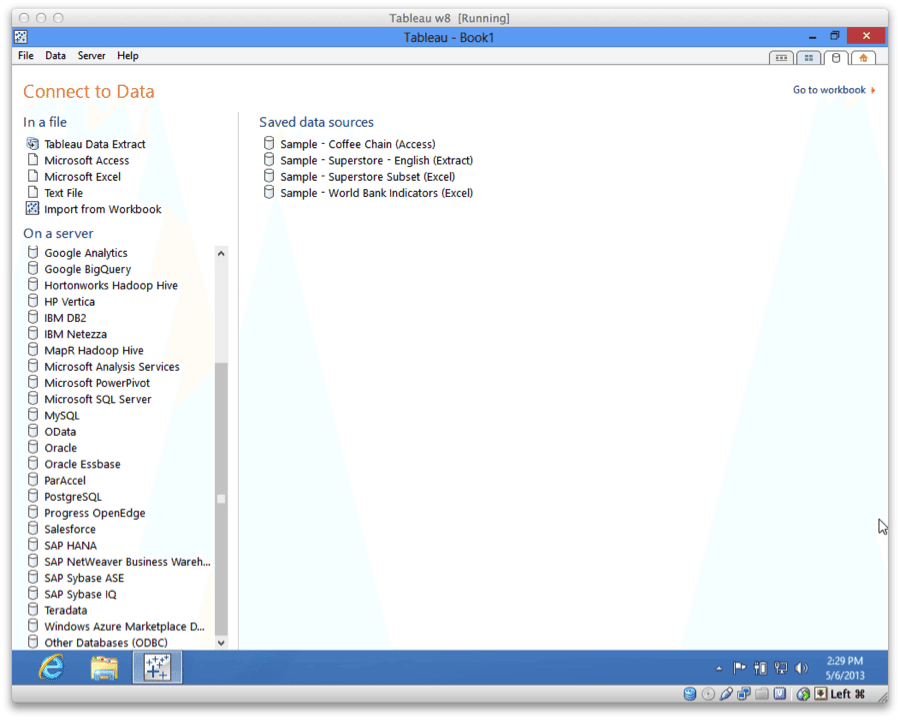
Tableau will present a menu that shows various data source options. In the left panel select the “Hortonworks Hadoop Hive” server option.

t03

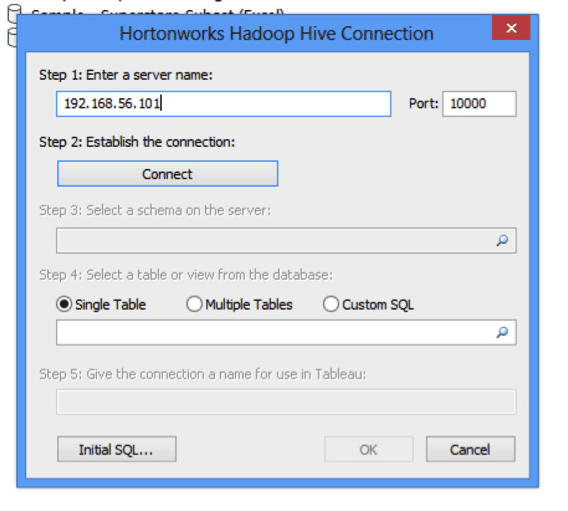
Tableau will then present the “Hortonworks Hadoop Hive Connection” configuration dialog. Enter the IP address of the Sandbox VM (typically 192.168.56.101) and then  click the “Connect” to establish the connection.

t04

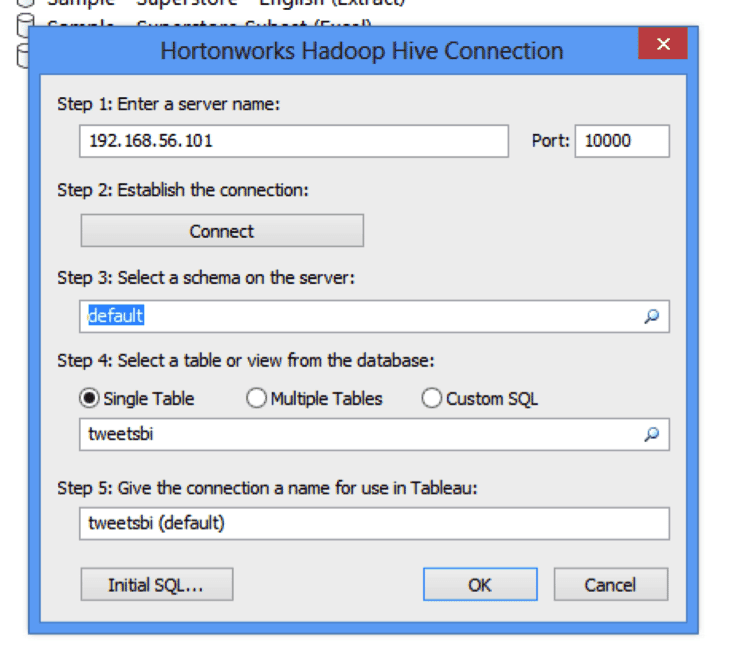
Now set the Schema to default. Then Go to tables and click on the spyglass icon. You will get a list of tables in Hive.

t05

Select the tables you would like to use (we use tweetsbi) and click “OK” at the bottom of the dialog.  This the data will be imported.

t06

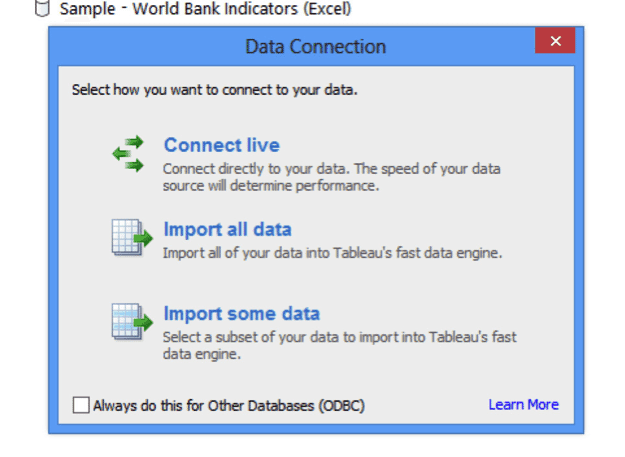
You have the option of using a Live connection where the data is imported as you need it or to import some or all the data at once. Choose your option.

t07

4. Visualize

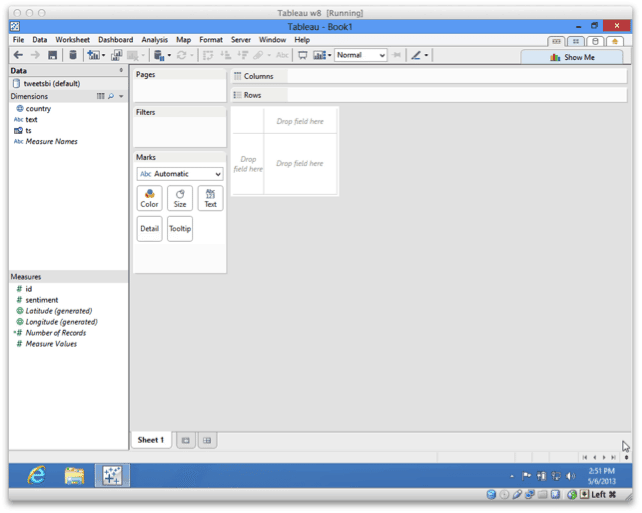
Once the data is imported you are ready to go.  Now you can use Tableau to visualize data in Hadoop and the Hortonworks Sandbox.

t08


Explore more with the Hortonworks Sandbox!

The post HOW TO: Connect Tableau to Hortonworks Sandbox appeared first on Hortonworks.


HOW TO: Connect/Write a File to Hortonworks Sandbox from Talend Studio

$
0
0

Writing a file to Hortonworks Sandbox from Talend Studio

I recently needed to quickly build some test data for my Hadoop environment and was looking for a tool to help me out. What I discovered was this is a very simple process within Talend Studio. (you can get the latest Talend Studio from their site)

Here is how…

Step 1 – Generating Test Data within Talend Studio

  • Create a New Job within the Job Designer
  • Drag a tRowGenerator onto the Designer
  • Double Click on your tRowGenerator component and add in fields you want to generate

Step 2 – Connecting to HDFS from Talend

  • Drag a tHDFSConnection onto the Designer
  • Change the “Name Node URI” property to point to your Hortonworks Sandbox on port 8020.
  • Change the connection your to “sandbox”.
  • Right click on the tHDFSConnection and add a OK trigger that connects the tHDFSConnection to the tRowGenerator

Step 3 – Writing to HDFS

  • Drag a tHDFSOutput onto the Designer
  • Change the “Name Node URI” property to point to your Hortonworks Sandbox on port 8020. Example:”hdfs://<YOUR SANDBOX IP>:8020/”
  • Change the connection your to “sandbox”.
  • Set the name of the output file in File Name field
  • Right click on the tRowGenerator and add a row main that connects the tRowGenerator to the tHDFSOutput

Step 4 – Running the Job from Talend

  •  Click on the “Run” Tab and press the “Run” button

Step 5 – Viewing the file in the Hortonworks Sandbox

  • Open your web browser and enter the URL: http://<YOUR SANDBOX IP>:8000
  • Click of the File Browser Icon on the top bar
  • Your file should have appeared within the sandbox user’s home directory

VOILA! 

The post HOW TO: Connect/Write a File to Hortonworks Sandbox from Talend Studio appeared first on Hortonworks.

HOWTO: Make the Sandbox run faster

$
0
0

If you are having performance issues with the Sandbox, try the following:

  1. Run only 1 virtual machine at a time
  2. Reboot the virtual machine
  3. Allocate more RAM to the Sandbox VM. This assumes you have more than 4GB of physical RAM on your system. To learn how to allocate more RAM to the VM, see the instructions for your virtualization platform:

The post HOWTO: Make the Sandbox run faster appeared first on Hortonworks.

HOWTO: Test HDFS Setup

$
0
0

ISSUE

How do I run simple Hadoop Distributed File System tasks? Or

How do I test that HDFS services are working?

SOLUTION

Make sure the name node and the data nodes are started.

To start the name node:

su hdfs - -c "hadoop-daemon.sh --config /etc/hadoop/ start namenode"

To start a data node:

su hdfs - -c "hadoop-daemon.sh --config /etc/hadoop start datanode"

Put data files into HDFS. This command will take a file from disk and put into HDFS:

su hdfs
hadoop fs -put trial_file.csv /user/hdfs/trial_file.csv

Read data from HDFS. This command will read the contents of a file from HDFS and display on the console:

su hdfs
hadoop fs -cat /user/hdfs/trial_file.csv

References:

http://hadoop.apache.org/common/docs/current/file_system_shell.html

The post HOWTO: Test HDFS Setup appeared first on Hortonworks.

Storm on YARN Install on HDP2 Beta Cluster

$
0
0

This is the installation instructions for Storm on YARN. Our work is based on the code and documentation provided by Yahoo in the Storm-YARN repository at https://github.com/yahoo/storm-yarn

We initially installed Centos 6.4 minimal installation on a single VM. This installation can be scaled up to a multinode configuration.

You will need to make the following changes to prepare for the HDP 2.0 beta installation:

Disable selinux using the command:

setenforce 0

Edit the SELinux configuration file:

vi /etc/selinux/config

Change SELINUX=enforcing to SELINUX=disabled

Stop the iptables firewall and disable it.

stop iptables
service iptables stop
chkconfig iptables off

Now you are to start the HDP 2.0 beta install:

Install the wget package

yum -y install wget

Get the repo for Ambari and copy it to /etc/yum.repos.d – if you’re not using CentOS please visit the HDP2 Documentation for the correct repo url.

wget http://public-repo-1.hortonworks.com/ambari-beta/centos6/1.x/beta/ambari.repo
cp ambari.repo /etc/yum.repos.d

Install Java7 and all your nodes.

yum -y install jdk-7u40-linux-x64.rpm on all nodes

Verify java_home is /usr/java/jdk1.7.0_40/

[root@yarndev ~]# java -version
java version "1.7.0_40"
Java(TM) SE Runtime Environment (build 1.7.0_40-b43)
Java HotSpot(TM) 64-Bit Server VM (build 24.0-b56, mixed mode)

If java –version comes up wrong you will need to create new symbolic links and update JAVA_HOME.  As root do the following  on all nodes-

rm /usr/bin/java
rm /usr/bin/javac
rm /usr/bin/javadoc
rm /usr/bin/javaws
ln -s  /usr/java/jdk1.7.0_40/bin/java /usr/bin/java
ln -s  /usr/java/jdk1.7.0_40/bin/javac /usr/bin/javac
ln -s /usr/java/jdk1.7.0_40/bin/javadoc /usr/bin/javadoc
ln -s /usr/java/jdk1.7.0_40/bin/javaws /usr/bin/javaws
echo “export JAVA_HOME=/usr/java/jdk1.7.0_40/” >> /etc/profile

Install ntpd, start service and sync time

yum -y install ntp
service ntpd start

Verify time is the same on all nodes.

Install Ambari server

yum -y install ambari-server

Run the Ambari server setup

ambari-server setup -s -j /usr/java/jdk1.7.0_40/

Details on the Ambari install can be found in the HDP 2.0 beta docs. Make sure to point to your jdk7 install.

Start Ambari server

ambari-server start

Install and start agents

ambari-agent start
edit ambari agent config file pointing it to the ambari-agent host.

Install Maven 3.11

wget http://mirror.symnds.com/software/Apache/maven/maven-3/3.1.1/binaries/apache-maven-3.1.1-bin.tar.gz

Untar the maven file

tar –zxvf apache-maven-3.1.1-bin.tar.gz

Move the maven binary to /usr/lib/maven

mv apache-maven-3.1.1 /usr/lib/maven

Add Maven to path environment variable

export PATH=$PATH:/usr/lib/maven/bin

Get a copy of the repository for Storm on YARN from GitHub

wget https://github.com/yahoo/storm-yarn/archive/master.zip

Unzip master

unzip master
cd storm-yarn-master

Edit the pom.xml repos and Hadoop version to point at Hortonworks.

soya1

Set up Storm on your cluster:

Create a work folder to hold working files for Storm. Copy these files to your work folder and set up the environment variables.

cp lib/storm.zip  /your/work/folder

Go to your work folder and unzip storm.zip
Add storm-0.9.0-wip2 and storm-yarn-master bin folders to path
Add storm.zip to hdfs /lib/storm/0.9.0-wip2/storm.zip

hdfs dfs –put storm.zip  /lib/storm/0.9.0-wip2/

Add storm-0.9.0-wip2 and storm-yarn-master bin folders to path. Make sure to update your workfolder!

export PATH=$PATH:/usr/lib/maven/bin:/your/work/folder/storm-0.9.0-wip21/bin:/your/work/folder/storm-yarn-master/bin

Start Maven in the storm-yarn-master folder.

cd storm-yarn-master
mvn package

Start Storm

storm-yarn launch

Get the stormconfig with the yarn application id

yarn application -list

We store the storm.yaml file in the .storm directory so the storm command can find it when it is submitting jobs.

storm-yarn getStormConfig -appId application_1381089732797_0025  -output ~/.storm/storm.yaml

Try running two of the sample topologies:

Word Count:

[hdfs@yarndev storm-yarn-master]$ storm jar lib/storm-starter-0.0.1-SNAPSHOT.jar storm.starter.WordCountTopology WordCountTopology

Exclamation:

[hdfs@yarndev storm-yarn-master]$ storm jar lib/storm-starter-0.0.1-SNAPSHOT.jar storm.starter.ExclamationTopology ExclamationTopology

Monitor the results:

Monitor the results by first finding what node the AM spawned on, this is almost going to be were Nimbus spawns.

cat ~/.storm/storm.yaml | grep nimbus.host

Visit yarndev:7070

soya2

The post Storm on YARN Install on HDP2 Beta Cluster appeared first on Hortonworks.

Spark 1.0.1 Technical Preview – with HDP 2.1.3

$
0
0

Introduction

The Spark Technical preview lets you evaluate Apache Spark 1.0.1 on YARN with HDP 2.1.3. With YARN, Hadoop can now support multiple different types of workloads; Spark on YARN becomes another workload running against the same set of hardware resources.

This guide describes how to run Spark on YARN. It also provides the canonical examples of running SparkPI and Wordcount with Spark shell.  When you are ready to go beyond that level of testing, try the machine learning examples at Apache Spark.

Requirements

To evaluate Spark on the HDP 2.1 Sandbox, add an entry to on your Host machine in /etc/hosts to enable Sandbox or localhost to resolve to 127.0.0.1. For example:

127.0.0.1 localhost sandbox.hortonworks.com

Installation and Configuration

The Spark 1.0.1 Technical Preview is provided as a single tarball.

Download the Spark Tarball

Use wget to download the Spark tarball:

wget http://public-repo-1.hortonworks.com/spark/centos6/tar/spark-1.0.1.2.1.3.0-563-bin-2.4.0.2.1.3.0-563.tgz

Copy the Spark Tarball to a HDP 2.1 Cluster:

Copy  the downloaded Spark tarball to your HDP 2.1 Sandbox or to your Hadoop cluster.

For example, the following command copies Spark to HDP 2.1 Sandbox:

scp -P 2222 spark-1.0.1.2.1.3.0-563-bin-2.4.0.2.1.3.0-563.tgz
root@127.0.0.1:/root

Note: The password for HDP 2.1 Sandbox is hadoop.

Untar the Tarball

To untar the Spark tarball, run:

tar xvfz spark-1.0.1.2.1.3.0-563-bin-2.4.0.2.1.3.0-563.tgz

Set the YARN environment variable

Specify the appropriate directory for your Hadoop cluster. For example, if your Hadoop and YARN config files are in /etc/hadoop/conf:

export YARN_CONF_DIR=/etc/hadoop/conf

Set yarn.application.classpath in yarn-site.xml. In the HDP 2.1 Sandbox yarn.application.classpath is already set, so there is no need to set yarn.application.classpath to set up Spark in HDP 2.1 Sandbox.

If you are running Spark in your own HDP 2.1 cluster ensure that yarn-site.xml has the following value for yarn.application.classpath property:

<property>
    <name>yarn.application.classpath</name>
    <value>/etc/hadoop/conf,/usr/lib/hadoop/*,/usr/lib/hadoop/lib/*,/usr/lib/hadoop-hdfs/*,/usr/lib/hadoop-hdfs/lib/*,/usr/lib/hadoop-yarn/*,/usr/lib/hadoop-yarn/lib/*</value>
</property>

Running the Spark Pi Example

To test compute intensive tasks in Spark, the Pi example calculates Π by “throwing darts” at a circle. The example points in the unit square ((0,0) to (1,1)) and sees how many fall in the unit circle. The fraction should be Π/4, which is used to estimate Pi.

To calculate Pi with Spark:

      1. Change to your Spark directory.

cd spark-1.0.1.2.1.3.0-563-bin-2.4.0.2.1.3.0-563

2. Run the Spark Pi example.

./bin/spark-submit --class org.apache.spark.examples.SparkPi    --master yarn-cluster  --num-executors 3 --driver-memory 512m  --executor-memory 512m   --executor-cores 1  lib/spark-examples*.jar 10

Note: The Pi job should complete without any failure messages and produce output similar to:

14/07/16 23:20:34 INFO yarn.Client: Application report from ASM: 
application identifier: application_1405567714475_0008
appId: 8
clientToAMToken: null
appDiagnostics: 
appMasterHost: sandbox.hortonworks.com
appQueue: default
appMasterRpcPort: 0
appStartTime: 1405578016384
yarnAppState: FINISHED
distributedFinalState: SUCCEEDED
appTrackingUrl: http://sandbox.hortonworks.com:8088/proxy/application_1405567714475_0008/A
appUser: root

3. To view the results in a browser, copy the appTrackingUrl and go to:

http://sandbox.hortonworks.com:8088/proxy/application_1405567714475_0008

Note: The two values above in bold are specific to your environment. These instructions assume that HDP 2.1 Sandbox is installed and that /etc/hosts is mapping sandbox.hortonworks.com to localhost.

4. Click the logs link in the bottom right.

The browser shows the YARN container output after a redirect.

Note the following output on the page. (Other output omitted for brevity.)

…..
14/07/14 16:00:25 INFO ApplicationMaster: AppMaster received a signal.
14/07/14 16:00:25 INFO ApplicationMaster: Deleting staging directory .sparkStaging/application_1405371122903_0002
Log Type: stdout
Log Length: 22
Pi is roughly 3.14102

Running WordCount on Spark

WordCount counts the number of words from a block of text, designated as the input file.

Copy input file for Spark WordCount Example

Upload the input file to use in WordCount to HDFS. You can use any text file as input. The following example uses log4j.properties:

hadoop fs -copyFromLocal /etc/hadoop/conf/log4j.properties /tmp/data

Run Spark WordCount

To run WordCount:

  1. Run the Spark shell:

./bin/spark-shell

2. If Spark-shell appears to hang, hit enter to get to a scala prompt.

scala>
val file = sc.textFile("hdfs://sandbox.hortonworks.com:8020/tmp/data")
val counts = file.flatMap(line => line.split(" ")).map(word => (word, 1)).reduceByKey(_ + _)
counts.saveAsTextFile("hdfs://sandbox.hortonworks.com:8020/tmp/wordcount")

Viewing the WordCount output using Scala Shell

To view the output in the scala shell:

scala > counts.count()

To print the full output of the WordCount job:

scala > counts.toArray().foreach(println)

Exit the scala shell.

  scala > exit

Viewing the WordCount output using HDFS

To read the output of WordCount using HDFS command:

  1. View WordCount results:

hadoop fs -ls /tmp/wordcount

It should display output similar to:

/tmp/wordcount/_SUCCESS
/tmp/wordcount/part-00000
/tmp/wordcount/part-00001

3. Use the HDFS cat command to see the WordCount output. For example:

hadoop fs -cat /tmp/wordcount/part-00000

Running the Machine Learning Spark Application

Make sure all of your nodemanager nodes have the gfortran library. If not, you need to install it in all of your nodemanager nodes.

sudo yum install gcc-gfortran

Note: The gfortran library is usually available in the updates repos for CentOS. For example:

sudo yum install gcc-gfortran --enablerepo=update

MLlib will throw a linking error if it cannot detect these libraries automatically. For example, if you try to do Collaborative Filtering without gfortran runtime library installed, you will see the following linking error:

java.lang.UnsatisfiedLinkError: org.jblas.NativeBlas.dposv(CII[DII[DII)I
   at org.jblas.NativeBlas.dposv(Native Method)
   at org.jblas.SimpleBlas.posv(SimpleBlas.java:369)
   at org.jblas.Solve.solvePositive(Solve.java:68)

Visit http://spark.apache.org/docs/latest/mllib-guide.html for Spark ML examples.

Troubleshooting

Issue:

Spark submitted job fails to run, appears to hang, and in the YARN container log contains the following error:

14/07/15 11:36:09 WARN YarnClusterScheduler: Initial job has not accepted any resources; check your cluster UI to ensure that workers are registered and have sufficient memory
14/07/15 11:36:24 WARN YarnClusterScheduler: Initial job has not accepted any resources; check your cluster UI to ensure that workers are registered and have sufficient memory
14/07/15 11:36:39 WARN YarnClusterScheduler: Initial job has not accepted any resources; check your cluster UI to ensure that workers are registered and have sufficient memory

Solution:

The Hadoop cluster must have sufficient memory for the request. For example, submitting the following job with 1GB memory allocated for executor and Spark driver will fail with the above error in the HDP 2.1 Sandbox.  Reduce the memory asked for the executor and the Spark driver to 512m and re-start the cluster.

./bin/spark-submit --class org.apache.spark.examples.SparkPi    --master yarn-cluster  --num-executors 3 --driver-memory 512m  --executor-memory 512m   --executor-cores 1  lib/spark-examples*.jar 10

Issue:

Error message about HDFS non-existent InputPath when running Machine Learning examples.

org.apache.hadoop.mapred.InvalidInputException: Input path does not exist: hdfs://sandbox.hortonworks.com:8020/user/root/mllib/data/sample_svm_data.txt
   at org.apache.hadoop.mapred.FileInputFormat.singleThreadedListStatus(FileInputFormat.java:285)
   at org.apache.hadoop.mapred.FileInputFormat.listStatus(FileInputFormat.java:228)
   at org.apache.hadoop.mapred.FileInputFormat.getSplits(FileInputFormat.java:304)
   at org.apache.spark.rdd.HadoopRDD.getPartitions(HadoopRDD.scala:140)
   at org.apache.spark.rdd.RDD$$anonfun$partitions$2.apply(RDD.scala:207)
   at org.apache.spark.rdd.RDD$$anonfun$partitions$2.apply(RDD.scala:205)
   at scala.Option.getOrElse(Option.scala:120)
   at org.apache.spark.rdd.RDD.partitions(RDD.scala:205)
   at org.apache.spark.rdd.MappedRDD.getPartitions(MappedRDD.scala:28)
   at org.apache.spark.rdd.RDD$$anonfun$partitions$2.apply(RDD.scala:207)
……
……
……
(Omitted for brevity.)

Solution:

Ensure that the input data is uploaded to HDFS.

Known Issues

At the time of this release, there are no known issues for Apache Spark.Visit the forum for the latest discussions on issues:

http://hortonworks.com/community/forums/forum/spark/

Further Reading

Apache Spark documentation is available here:

https://spark.apache.org/docs/latest/

The post Spark 1.0.1 Technical Preview – with HDP 2.1.3 appeared first on Hortonworks.

Spark 1.1.0 Technical Preview on HDP 2.1.5

$
0
0

Spark 1.1.0 Technical Preview – with HDP 2.1.5

Introduction

The Spark Technical preview lets you evaluate Apache Spark 1.1.0 on YARN with HDP 2.1.5. With YARN, Hadoop can now support various types of workloads; Spark on YARN becomes yet another workload running against the same dataset and hardware resources.

This technical preview describes how to:

  • Run Spark on YARN and runs the canonical Spark examples of running SparkPI and Wordcount
  • Work with a built-in UDF, collect-list, a key feature of Hive 13. This technical preview provides support for Hive 0.13.1 and instructions on how to call this UDF from Spark shell.
  • Use ORC file as an HadoopRDD.

When you are ready to go beyond that these tasks, try the machine learning examples at Apache Spark.

Requirements

To evaluate Spark on the HDP 2.1 Sandbox, add an entry to on your Host machine in /etc/hosts to enable Sandbox or localhost to resolve to 127.0.0.1. For example:

127.0.0.1 localhost sandbox.hortonworks.com

Installing

The Spark 1.1.0 Technical Preview is provided as a single tarball.

Download the Spark Tarball

Use wget to download the Spark tarball:

wget http://public-repo-1.hortonworks.com/spark/centos6/1.1.0/tars/spark-1.1.0.2.1.5.0-695-bin-2.4.0.2.1.5.0-695.tgz

Copy the Spark Tarball to a HDP 2.1 Cluster:

Copy  the downloaded Spark tarballto your HDP 2.1 Sandbox or to your Hadoop cluster.
For example, the following command copies Spark to HDP 2.1 Sandbox:

scp -P 2222 spark-1.1.0.2.1.5.0-695-bin-2.4.0.2.1.5.0-695.tgz root@127.0.0.1:/root

Note: The password for HDP 2.1 Sandbox is hadoop.

Untar the Tarball

To untar the Spark tarball, run:

tar xvfz spark-1.1.0.2.1.5.0-695-bin-2.4.0.2.1.5.0-695.tgz

Set the YARN environment variable

Specify the appropriate directory for your Hadoop cluster. For example, if your Hadoop and YARN config files are in /etc/hadoop/conf:

export YARN_CONF_DIR=/etc/hadoop/conf

Set yarn.application.classpath in yarn-site.xml. In the HDP 2.1 Sandbox, yarn.application.classpath is already set, so there is no need to set yarn.application.classpath to set up Spark on the HDP 2.1 Sandbox.

If you are running Spark against your own HDP 2.1 cluster ensure that yarn-site.xml has the following value for yarn.application.classpath property:

<property>
    <name>yarn.application.classpath</name>
   <value>/etc/hadoop/conf,/usr/lib/hadoop/*,/usr/lib/hadoop/lib/*,/usr/lib/hadoop-hdfs/*,/usr/lib/hadoop-hdfs/lib/*,/usr/lib/hadoop-yarn/*,/usr/lib/hadoop-yarn/lib/*</value>
 </property>

Run Spark Pi Example

To test compute intensive tasks in Spark, the Pi example calculates pi by “throwing darts” at a circle. The example points in the unit square ((0,0) to (1,1)) and sees how many fall in the unit circle. The fraction should be pi/4, which is used to estimate Pi.

To calculate Pi with Spark:

Change to your Spark directory:

cd spark-1.1.0.2.1.5.0-695-bin-2.4.0.2.1.5.0-695

Run the Spark Pi example:

./bin/spark-submit --class org.apache.spark.examples.SparkPi    --master yarn-cluster  --num-executors 3 --driver-memory 512m  --executor-memory 512m   --executor-cores 1  lib/spark-examples*.jar 10

Note: The Pi job should complete without any failure messages and produce output similar to:

14/09/12 09:52:01 INFO yarn.Client: Application report from ResourceManager:
application identifier: application_1410479103337_0003
appId: 3
clientToAMToken: null
appDiagnostics:
appMasterHost: sandbox.hortonworks.com
appQueue: default
appMasterRpcPort: 0
appStartTime: 1410540670802
yarnAppState: FINISHED
distributedFinalState: SUCCEEDED
appTrackingUrl: http://sandbox.hortonworks.com:8088/proxy/application_1410479103337_0003/A
appUser: root

To view the results in a browser, copy the appTrackingUrl and go to:

http://sandbox.hortonworks.com:8088/proxy/application_1410479103337_0003/A

Note: The two values above in bold are specific to your environment. These instructions assume that HDP 2.1 Sandbox is installed and that /etc/hosts is mapping sandbox.hortonworks.com to localhost.

Using WordCount with Spark

Click the logs link in the bottom right

The browser shows the YARN container output after a redirect.

Note the following output on the page. (Other output omitted for brevity.)

…..
14/09/12 09:52:00 INFO yarn.ApplicationMaster: AppMaster received a signal.
14/09/12 09:52:00 INFO yarn.ApplicationMaster: Deleting staging directory .sparkStaging/application_1410479103337_0003
14/09/12 09:52:00 INFO yarn.ApplicationMaster$$anon$1: Invoking sc stop from shutdown hook
14/09/12 09:52:00 INFO ui.SparkUI: Stopped Spark web UI at http://sandbox.hortonworks.com:42078
14/09/12 09:52:00 INFO spark.SparkContext: SparkContext already stopped
Log Type: stdout
Log Length: 23
Pi is roughly 3.144484

Copy input file for Spark WordCount Example

Upload the input file you want to use in WordCount to HDFS. You can use any text file as input. In the following example, log4j.properties is used as an example:

hadoop fs -copyFromLocal /etc/hadoop/conf/log4j.properties /tmp/data

Run Spark WordCount

To run WordCount:
Run the Spark shell:

./bin/spark-shell

Output similar to below displays before the Scala REPL prompt, scala>:

Spark assembly has been built with Hive, including Datanucleus jars on classpath
 14/09/11 17:33:47 INFO spark.SecurityManager: Changing view acls to: root,
 14/09/11 17:33:47 INFO spark.SecurityManager: Changing modify acls to: root,
 14/09/11 17:33:47 INFO spark.SecurityManager: SecurityManager: authentication disabled; ui acls disabled; users with view permissions: Set(root, ); users with modify permissions: Set(root, )
 14/09/11 17:33:47 INFO spark.HttpServer: Starting HTTP Server
 14/09/11 17:33:47 INFO server.Server: jetty-8.y.z-SNAPSHOT
 14/09/11 17:33:47 INFO server.AbstractConnector: Started SocketConnector@0.0.0.0:44066
 14/09/11 17:33:47 INFO util.Utils: Successfully started service 'HTTP class server' on port 44066.
Welcome to 
 ____              __
/ __/__  ___ _____/ /__
_\ \/ _ \/ _ `/ __/  '_/
/___/ .__/\_,_/_/ /_/\_\   version 1.1.0
   /_/
Spark context available as sc.
scala>

At the Scala REPL prompt enter:

val file = sc.textFile("hdfs://sandbox.hortonworks.com:8020/tmp/data")
val counts = file.flatMap(line => line.split(" ")).map(word => (word, 1)).reduceByKey(_ + _)
counts.saveAsTextFile("hdfs://sandbox.hortonworks.com:8020/tmp/wordcount")
Viewing the WordCount output with Scala Shell

To view the output in Scala Shell:

scala > counts.count()

To print the full output of the WordCount job:

scala > counts.toArray().foreach(println)
Viewing the WordCount output with HDFS

To read the output of WordCount using HDFS command:

Exit the scala shell.

scala > exit

View  WordCount Results:

hadoop fs -ls /tmp/wordcount

It should display output similar to:

/tmp/wordcount/_SUCCESS
/tmp/wordcount/part-00000
/tmp/wordcount/part-00001

Use the HDFS cat command to see the WordCount output. For example:

hadoop fs -cat /tmp/wordcount/part-00000

Running Hive 0.13.1 UDF

Before running Hive examples run the following steps:

Copy hive-site to Spark conf

For example, ensure the paths used match your environment:

cp /usr/lib/hive/conf/hive-site.xml /root/spark-1.1.0.2.1.5.0-695-bin-2.4.0.2.1.5.0-695/conf/

Comment out ATS Hooks

Ensure the following properties in the Spark copy of hive-site.xml are removed (or commented out):

<name>hive.exec.pre.hooks</name>
     <value>org.apache.hadoop.hive.ql.hooks.ATSHook</value>
<name>hive.exec.failure.hooks</name>
     <value>org.apache.hadoop.hive.ql.hooks.ATSHook</value>
<name>hive.exec.post.hooks</name>
     <value>org.apache.hadoop.hive.ql.hooks.ATSHook</value>

Hive 0.13.1 provides  a new built-in UDF collect_list(col) which returns a list of objects with duplicates.

Launch Spark Shell on YARN cluster

./bin/spark-shell --num-executors 2 --executor-memory 512m --master yarn-client

Create Hive Context

scala> val hiveContext = new org.apache.spark.sql.hive.HiveContext(sc)

You should see output similar to the following:

…
hiveContext: org.apache.spark.sql.hive.HiveContext = org.apache.spark.sql.hive.HiveContext@7d9b2e8d

Create Hive Table

scala> hiveContext.hql("CREATE TABLE IF NOT EXISTS TestTable (key INT, value STRING)")

You should see output similar to the following:

…
res1: org.apache.spark.sql.SchemaRDD =
SchemaRDD[5] at RDD at SchemaRDD.scala:103
== Query Plan ==
<Native command: executed by Hive>

Load example KV value data into Table

scala> hiveContext.hql("LOAD DATA LOCAL INPATH 'examples/src/main/resources/kv1.txt' INTO TABLE TestTable")

You should see output similar to the following:

14/09/12 10:05:20 INFO log.PerfLogger: </PERFLOG method=Driver.run start=1410541518525 end=1410541520023 duration=1498 from=org.apache.hadoop.hive.ql.Driver>
res2: org.apache.spark.sql.SchemaRDD =
SchemaRDD[8] at RDD at SchemaRDD.scala:103
== Query Plan ==
<Native command: executed by Hive>

Invoke Hive collect_list UDF

scala> hiveContext.hql("from TestTable SELECT key, collect_list(value) group by key order by key").collect.foreach(println)

You should see output similar to the following:

…
[489,ArrayBuffer(val_489, val_489, val_489, val_489)]
[490,ArrayBuffer(val_490)]
[491,ArrayBuffer(val_491)]
[492,ArrayBuffer(val_492, val_492)]
[493,ArrayBuffer(val_493)]
[494,ArrayBuffer(val_494)]
[495,ArrayBuffer(val_495)]
[496,ArrayBuffer(val_496)]
[497,ArrayBuffer(val_497)]
[498,ArrayBuffer(val_498, val_498, val_498)]

Using ORC file as HadoopRDD

Create a new Hive Table with ORC format

scala>hiveContext.sql("create table orc_table(key INT, value STRING) stored as orc")

Load Data into the ORC table

scala>hiveContext.hql("INSERT INTO table orc_table select * from testtable")

Verify that Data is loaded into the ORC table

scala>hiveContext.hql("FROM orc_table SELECT *").collect().foreach(println)

Read ORC Table from HDFS as HadoopRDD

scala> val inputRead = sc.hadoopFile("hdfs://sandbox.hortonworks.com:8020/apps/hive/warehouse/orc_table",classOf[org.apache.hadoop.hive.ql.io.orc.OrcInputFormat],classOf[org.apache.hadoop.io.NullWritable],classOf[org.apache.hadoop.hive.ql.io.orc.OrcStruct])

Verify we can manipulate the ORC record through RDD

scala&gt; val k = inputRead.map(pair =&gt; pair._2.toString)
scala&gt; val c = k.collect

You should see output similar to the following:

...
scheduler.DAGScheduler: Stage 7 (collect at <console>:16) finished in 0.518 s
14/09/16 11:54:58 INFO spark.SparkContext: Job finished: collect at <console>:16, took 0.532203184 s
c1: Array[String] = Array({238, val_238}, {86, val_86}, {311, val_311}, {27, val_27}, {165, val_165}, {409, val_409}, {255, val_255}, {278, val_278}, {98, val_98}, {484, val_484}, {265, val_265}, {193, val_193}, {401, val_401}, {150, val_150}, {273, val_273}, {224, val_224}, {369, val_369}, {66, val_66}, {128, val_128}, {213, val_213}, {146, val_146}, {406, val_406}, {429, val_429}, {374, val_374}, {152, val_152}, {469, val_469}, {145, val_145}, {495, val_495}, {37, val_37}, {327, val_327}, {281, val_281}, {277, val_277}, {209, val_209}, {15, val_15}, {82, val_82}, {403, val_403}, {166, val_166}, {417, val_417}, {430, val_430}, {252, val_252}, {292, val_292}, {219, val_219}, {287, val_287}, {153, val_153}, {193, val_193}, {338, val_338}, {446, val_446}, {459, val_459}, {394, val_394}, {...

Running the Machine Learning Spark Application

Make sure all of your nodemanager nodes have gfortran library. If not, you need to install it in all of your nodemanager nodes.

sudo yum install gcc-gfortran

Note: It is usually available in the update repo for CentOS. For example:

sudo yum install gcc-gfortran --enablerepo=update

MLlib throws  a linking error if it cannot detect these libraries automatically. For example, if you try to do Collaborative Filtering without gfortran runtime library installed, you will see the following linking error:

java.lang.UnsatisfiedLinkError: org.jblas.NativeBlas.dposv(CII[DII[DII)I
     at org.jblas.NativeBlas.dposv(Native Method)
     at org.jblas.SimpleBlas.posv(SimpleBlas.java:369)
     at org.jblas.Solve.solvePositive(Solve.java:68)

Visit http://spark.apache.org/docs/latest/mllib-guide.html for Spark ML examples.

Troubleshooting

Issue:

Spark submit fails.

Note the error about failure to set the env:

Exception in thread "main" java.lang.Exception: When running with master 'yarn-cluster' either HADOOP_CONF_DIR or YARN_CONF_DIR must be set in the environment.  
  at
org.apache.spark.deploy.SparkSubmitArguments.checkRequiredArguments(SparkSubmitArguments.scala:182)
…

Solution:

Set the environment variable YARN_CONF_DIR as following.

export YARN_CONF_DIR=/etc/hadoop/conf

Issue:

Spark submitted job fails to run and appears to hang.

In the YARN container log you will notice the following error:

14/07/15 11:36:09 WARN YarnClusterScheduler: Initial job has not accepted any resources; check your cluster UI to ensure that workers are registered and have sufficient memory
 14/07/15 11:36:24 WARN YarnClusterScheduler: Initial job has not accepted any resources; check your cluster UI to ensure that workers are registered and have sufficient memory
 14/07/15 11:36:39 WARN YarnClusterScheduler: Initial job has not accepted any resources; check your cluster UI to ensure that workers are registered and have sufficient memory

Solution:

The Hadoop cluster must have sufficient memory for the request. For example, submitting the following job with 1GB memory allocated for executor and Spark driver fails with the above error in the HDP 2.1 Sandbox.  Reduce the memory asked for the executor and the Spark driver to 512m and re-start the cluster.

./bin/spark-submit --class org.apache.spark.examples.SparkPi    --master yarn-cluster  --num-executors 3 --driver-memory 512m  --executor-memory 512m   --executor-cores 1  lib/spark-examples*.jar 10

Issue:

Error message aboutHDFS non-existent InputPath when running Machine Learning examples.

org.apache.hadoop.mapred.InvalidInputException: Input path does not exist: hdfs://sandbox.hortonworks.com:8020/user/root/mllib/data/sample_svm_data.txt
at 
org.apache.hadoop.mapred.FileInputFormat.singleThreadedListStatus(FileInputFormat.java:285)
at org.apache.hadoop.mapred.FileInputFormat.listStatus(FileInputFormat.java:228)
at org.apache.hadoop.mapred.FileInputFormat.getSplits(FileInputFormat.java:304)
at org.apache.spark.rdd.HadoopRDD.getPartitions(HadoopRDD.scala:140)
at org.apache.spark.rdd.RDD$$anonfun$partitions$2.apply(RDD.scala:207)
at org.apache.spark.rdd.RDD$$anonfun$partitions$2.apply(RDD.scala:205)
at scala.Option.getOrElse(Option.scala:120)
at org.apache.spark.rdd.RDD.partitions(RDD.scala:205)
at org.apache.spark.rdd.MappedRDD.getPartitions(MappedRDD.scala:28)
at org.apache.spark.rdd.RDD$$anonfun$partitions$2.apply(RDD.scala:207)
……
……
……

(Omitted for brevity.)

Solution:

Ensure that the input data is uploaded to HDFS.

Known Issues

Spark Thrift Server does not work with this tech preview.

There are no other known issues for Apache Spark. Visit the forum for the latest discussions on issues:

http://hortonworks.com/community/forums/forum/spark/

Further Reading

Apache Spark documentation is available here:

https://spark.apache.org/docs/latest/

The post Spark 1.1.0 Technical Preview on HDP 2.1.5 appeared first on Hortonworks.
HOWTO: Test HDFS Setup

$
0
0

ISSUE

How do I run simple Hadoop Distributed File System tasks? Or

How do I test that HDFS services are working?

SOLUTION

Make sure the name node and the data nodes are started.

To start the name node:

su hdfs - -c "hadoop-daemon.sh --config /etc/hadoop/ start namenode"

To start a data node:

su hdfs - -c "hadoop-daemon.sh --config /etc/hadoop start datanode"

Put data files into HDFS. This command will take a file from disk and put into HDFS:

su hdfs
hadoop fs -put trial_file.csv /user/hdfs/trial_file.csv

Read data from HDFS. This command will read the contents of a file from HDFS and display on the console:

su hdfs
hadoop fs -cat /user/hdfs/trial_file.csv

References:

http://hadoop.apache.org/common/docs/current/file_system_shell.html

The post HOWTO: Test HDFS Setup appeared first on Hortonworks.


HOWTO: Test MapReduce Setup

$
0
0

ISSUE

How do I run an example map reduce job? Or

How do I test the map reduce services are working?

SOLUTION

Make sure the job tracker and the task trackers are started.

To start the job tracker:

su mapred - -c "hadoop-daemon.sh --config /etc/hadoop start jobtracker; sleep 25"

To start a task tracker:

su mapred - -c "hadoop-daemon.sh --config /etc/hadoop start tasktracker"

Run a map reduce job from the hadoop examples jar. This jar packages up a few example map reduce classes. The following command runs the sleep example with one mapper and one reducer:

hadoop jar /usr/share/hadoop/hadoop-examples-1.0.0.jar sleep -m 1 -r 1

The map reduce job will write outpts to the console. These outputs provide the job id that can be used to track the status of the job. The console output also displays the progress of the maps and reducers.…

The post HOWTO: Test MapReduce Setup appeared first on Hortonworks.

Using Apache Spark: Technical Preview with HDP 2.2

$
0
0

Introduction

The Spark Technical preview lets you evaluate Apache Spark 1.2.0 on YARN with HDP 2.2. With YARN, Hadoop can now support various types of workloads; Spark on YARN becomes yet another workload running against the same set of hardware resources.

This technical preview describes how to:

  • Run Spark on YARN and run the canonical Spark examples: SparkPI and Wordcount.
  • Run Spark 1.2 on HDP 2.2.
  • Work with a built-in UDF, collect_list, a key feature of Hive 13. This technical preview provides support for Hive 0.13.1 and instructions on how to call this UDF from Spark shell.
  • Use SparkSQL thrift JDBC/ODBC Server.
  • View history of finished jobs with Spark Job History.
  • Use ORC files with Spark, with examples.
  • Run SparkPI with Tez as the execution engine.

When you are ready to go beyond these tasks, try the machine learning examples at Apache Spark.

HDP Sandbox Requirements

To evaluate Spark on the HDP 2.2 Sandbox, add an entry to /etc/hosts on your Host machine to enable Sandbox or localhost to resolve to 127.0.0.1. For example:

127.0.0.1 localhost sandbox.hortonworks.com

Ensure port forwarding (from host to guest) in the HDP Sandbox for ports 4040, 8042, 18080, and 19188.

Install the Technical Preview

The Spark 1.2.0 Technical Preview is provided as a single tarball.

Download the Spark Tarball

Use wget to download the Spark tarball:

wget http://public-repo-1.hortonworks.com/HDP-LABS/Projects/spark/1.2.0/spark-1.2.0.2.2.0.0-82-bin-2.6.0.2.2.0.0-2041.tgz

Copy the Spark Tarball to a HDP 2.2 Cluster

Copy the downloaded Spark tarball to your HDP 2.2 Sandbox or to your Hadoop cluster.

For example, the following command copies Spark to HDP 2.2 Sandbox:

scp -P 2222 spark-1.2.0.2.2.0.0-82-bin-2.6.0.2.2.0.0-2041.tgz 
root@127.0.0.1:/root

Note: The password for the HDP 2.2 Sandbox is hadoop.

Untar the Tarball

To untar the Spark tarball, run:

tar xvfz spark-1.2.0.2.2.0.0-82-bin-2.6.0.2.2.0.0-2041.tgz

The directory where Spark tarball is expanded is SPARK_HOME

Set up the environment

Specify the appropriate directory for your Hadoop cluster. For example, if your Hadoop and YARN config files are in /etc/hadoop/conf:

  1. Set environment variable
    export YARN_CONF_DIR=/etc/hadoop/conf
  2. Create a file SPARK_HOME/conf/spark-defaults.conf and add the following settings:
    spark.driver.extraJavaOptions -Dhdp.version=2.2.0.0-2041
    spark.yarn.am.extraJavaOptions -Dhdp.version=2.2.0.0-2041

Run the Spark Pi Example

To test compute-intensive tasks in Spark, the Pi example calculates pi by “throwing darts” at a circle. The example points in the unit square ((0,0) to (1,1)) and sees how many fall in the unit circle. The fraction should be pi/4, which is used to estimate Pi.

To calculate Pi with Spark:

  1. Navigate to your Spark directory:
    cd <SPARK_HOME>
  2. Run the Spark Pi example:
    ./bin/spark-submit --class org.apache.spark.examples.SparkPi    --master yarn-cluster  --num-executors 3 --driver-memory 512m  --executor-memory 512m   --executor-cores 1  lib/spark-examples*.jar 10

    Note: The Pi job should complete without any failure messages and produce output similar to the following:

    14/12/19 19:46:38 INFO impl.YarnClientImpl: Submitted application application_1419016680263_0002
    14/12/19 19:46:39 INFO yarn.Client: Application report for application_1419016680263_0002 (state: ACCEPTED)
    14/12/19 19:46:39 INFO yarn.Client:
          client token: N/A
          diagnostics: N/A
          ApplicationMaster host: N/A
          ApplicationMaster RPC port: -1
          queue: default
          start time: 1419018398442
          final status: UNDEFINED
          tracking URL: http://sandbox.hortonworks.com:8088/proxy/application_1419016680263_0002/
          user: root
  3. To view the results in a browser, copy the appTrackingUrl and go to:
    http://sandbox.hortonworks.com:8088/proxy/application_1419016680263_0002/A

Notes:

  • The two values above in bold are specific to your environment.
  • These instructions assume that HDP 2.2 Sandbox is installed and that /etc/hosts maps sandbox.hortonworks.com to localhost.

Using WordCount with Spark

Click the “logs” link in the bottom right

The browser shows the YARN container output after a redirect.
Note the following output on the page. (Other output omitted for brevity.)

…
14/12/22 17:13:30 INFO yarn.ApplicationMaster: Unregistering ApplicationMaster with SUCCEEDED
14/12/22 17:13:30 INFO impl.AMRMClientImpl: Waiting for application to be successfully unregistered.
14/12/22 17:13:30 INFO remote.RemoteActorRefProvider$RemotingTerminator: Remoting shut down.
14/12/22 17:13:30 INFO yarn.ApplicationMaster: Deleting staging directory .sparkStaging/application_1419016680263_0005

Log Type: stdout
Log Upload Time: 22-Dec-2014 17:13:33
Log Length: 23
Pi is roughly 3.143824

Copy input file for Spark WordCount Example

Upload the input file you want to use in WordCount to HDFS. You can use any text file as input.
In the following example, log4j.properties is used as an example:

hadoop fs -copyFromLocal /etc/hadoop/conf/log4j.properties /tmp/data

Run Spark WordCount

To run WordCount:

  1. Run the Spark shell:
    ./bin/spark-shell --master yarn-client --driver-memory 512m --executor-memory 512m

    You should see output similar to the following, before the Scala REPL prompt, “scala>”:

    14/12/22 17:27:38 INFO util.Utils: Successfully started service 'HTTP class server' on port 41936.
    Welcome to
       ____              __
      / __/__  ___ _____/ /__
     _\ \/ _ \/ _ `/ __/  '_/
    /___/ .__/\_,_/_/ /_/\_\   version 1.2.0
       /_/
    Using Scala version 2.10.4 (OpenJDK 64-Bit Server VM, Java 1.7.0_71)
    Type in expressions to have them evaluated.
    …
    4/12/22 17:28:27 INFO yarn.Client: Application report for application_1419016680263_0006 (state: ACCEPTED)
    14/12/22 17:28:28 INFO yarn.Client:
          client token: N/A
          diagnostics: N/A
          ApplicationMaster host: N/A
          ApplicationMaster RPC port: -1
          queue: default
          start time: 1419269306798
          final status: UNDEFINED
          tracking URL: http://sandbox.hortonworks.com:8088/proxy/application_1419016680263_0006/
          user: root
    …
    14/12/22 17:29:23 INFO cluster.YarnClientSchedulerBackend: SchedulerBackend is ready for scheduling beginning after waiting maxRegisteredResourcesWaitingTime: 30000(ms)
    14/12/22 17:29:23 INFO repl.SparkILoop: Created spark context..
    Spark context available as sc.
    
    scala>
    
  2. At the Scala REPL prompt, enter:
    val file = sc.textFile("hdfs://sandbox.hortonworks.com:8020/tmp/data")
    val counts = file.flatMap(line => line.split(" ")).map(word => (word, 1)).reduceByKey(_ + _)
    counts.saveAsTextFile("hdfs://sandbox.hortonworks.com:8020/tmp/wordcount")
Viewing the WordCount output in the Scala Shell

To view the output in the scala shell:

counts.count()

To print the full output of the WordCount job:

counts.toArray().foreach(println)
Viewing the WordCount output using HDFS

To read the output of WordCount using the HDFS command:

  1. Exit the scala shell:
    scala > exit
  2. View WordCount Results:
    hadoop fs -ls /tmp/wordcount

    You should see output similar to the following:

    /tmp/wordcount/_SUCCESS
    /tmp/wordcount/part-00000
    /tmp/wordcount/part-00001
  3. Use the HDFS cat command to see the WordCount output. For example,
    hadoop fs -cat /tmp/wordcount/part-00000

Running Hive 0.13.1 UDF

Before running Hive examples run the following steps:

Create hive-site in Spark conf

Create the file SPARK_HOME/conf/hive-site.xml.
Edit the file to contain only the following statements:

<configuration>
<property>
  <name>hive.metastore.uris</name>
  <!-- Ensure that the following statement points to the Hive Metastore URI in your cluster -->
  <value>thrift://sandbox.hortonworks.com:9083</value>
  <description>URI for client to contact metastore server</description>
</property>
</configuration>

Hive 0.13.1 provides a new built-in UDF collect_list(col), which returns a list of objects with duplicates.

Launch the Spark Shell on YARN cluster

./bin/spark-shell --num-executors 2 --executor-memory 512m --master yarn-client

Create Hive Context

val hiveContext = new org.apache.spark.sql.hive.HiveContext(sc)

You should see output similar to the following:

…
hiveContext: org.apache.spark.sql.hive.HiveContext = org.apache.spark.sql.hive.HiveContext@7d9b2e8d

Create Hive Table

hiveContext.hql("CREATE TABLE IF NOT EXISTS TestTable (key INT, value STRING)")

You should see output similar to the following:

…
res0: org.apache.spark.sql.SchemaRDD =
SchemaRDD[0] at RDD at SchemaRDD.scala:108
== Query Plan ==
<Native command: executed by Hive>

Load example KV value data into Table

hiveContext.hql("LOAD DATA LOCAL INPATH 'examples/src/main/resources/kv1.txt' INTO TABLE TestTable")

You should see output similar to the following:

14/12/22 18:37:45 INFO log.PerfLogger: <PERFLOG method=releaseLocks from=org.apache.hadoop.hive.ql.Driver>
14/12/22 18:37:45 INFO log.PerfLogger: </PERFLOG method=releaseLocks start=1419273465053 end=1419273465053 duration=0 from=org.apache.hadoop.hive.ql.Driver>
14/12/22 18:37:45 INFO log.PerfLogger: </PERFLOG method=Driver.run start=1419273463944 end=1419273465053 duration=1109 from=org.apache.hadoop.hive.ql.Driver>
res1: org.apache.spark.sql.SchemaRDD =
SchemaRDD[2] at RDD at SchemaRDD.scala:108
== Query Plan ==
<Native command: executed by Hive>

Invoke Hive collect_list UDF

hiveContext.hql("from TestTable SELECT key, collect_list(value) group by key order by key").collect.foreach(println)

You should see output similar to the following:

…
[489,ArrayBuffer(val_489, val_489, val_489, val_489)]
[490,ArrayBuffer(val_490)]
[491,ArrayBuffer(val_491)]
[492,ArrayBuffer(val_492, val_492)]
[493,ArrayBuffer(val_493)]
[494,ArrayBuffer(val_494)]
[495,ArrayBuffer(val_495)]
[496,ArrayBuffer(val_496)]
[497,ArrayBuffer(val_497)]
[498,ArrayBuffer(val_498, val_498, val_498)]

Example: Reading and Writing an ORC File

This Tech Preview provides full support for ORC files with Spark. We will walk through an example that reads and writes an ORC file and uses ORC schema to infer a table.

ORC File Support

Create a new Hive Table with ORC format

hiveContext.sql("create table orc_table(key INT, value STRING) stored as orc")

Load Data into the ORC table

hiveContext.hql("INSERT INTO table orc_table select * from testtable")

Verify that Data is loaded into the ORC table

hiveContext.hql("FROM orc_table SELECT *").collect().foreach(println)

Read ORC Table from HDFS as HadoopRDD

val inputRead = sc.hadoopFile("hdfs://sandbox.hortonworks.com:8020/apps/hive/warehouse/orc_table", classOf[org.apache.hadoop.hive.ql.io.orc.OrcInputFormat],classOf[org.apache.hadoop.io.NullWritable],classOf[org.apache.hadoop.hive.ql.io.orc.OrcStruct])

Verify that you can manipulate the ORC record through RDD

val k = inputRead.map(pair => pair._2.toString)
val c = k.collect

You should see output similar to the following:

...
14/12/22 18:41:37 INFO scheduler.DAGScheduler: Stage 7 (collect at <console>:16) finished in 0.418 s
14/12/22 18:41:37 INFO scheduler.DAGScheduler: Job 4 finished: collect at <console>:16, took 0.437672 s
c: Array[String] = Array({238, val_238}, {86, val_86}, {311, val_311}, {27, val_27}, {165, val_165}, {409, val_409}, {255, val_255}, {278, val_278}, {98, val_98}, {484, val_484}, {265, val_265}, {193, val_193}, {401, val_401}, {150, val_150}, {273, val_273}, {224, val_224}, {369, val_369}, {66, val_66}, {128, val_128}, {213, val_213}, {146, val_146}, {406, val_406}, {429, val_429}, {374, val_374}, {152, val_152}, {469, val_469}, {145, val_145}, {495, val_495}, {37, val_37}, {327, val_327}, {281, val_281}, {277, val_277}, {209, val_209}, {15, val_15}, {82, val_82}, {403, val_403}, {166, val_166}, {417, val_417}, {430, val_430}, {252, val_252}, {292, val_292}, {219, val_219}, {287, val_287}, {153, val_153}, {193, val_193}, {338, val_338}, {446, val_446}, {459, val_459}, {394, val_394}, {2…

Copy example table into HDFS

cd SPARK_HOME
hadoop dfs -put examples/src/main/resources/people.txt people.txt

Run Spark-Shell

./bin/spark-shell --num-executors 2 --executor-memory 512m --master yarn-client

At the Scala prompt type the following (except for the comments):

import org.apache.spark.sql.hive.orc._
import org.apache.spark.sql._
# Load and register the spark table
val hiveContext = new org.apache.spark.sql.hive.HiveContext(sc)
val people = sc.textFile("people.txt")
val schemaString = "name age"
val schema = StructType(schemaString.split(" ").map(fieldName => {if(fieldName == "name") StructField(fieldName, StringType, true) else StructField(fieldName, IntegerType, true)}))
val rowRDD = people.map(_.split(",")).map(p => Row(p(0), new Integer(p(1).trim)))
# Infer table schema from RDD
val peopleSchemaRDD = hiveContext.applySchema(rowRDD, schema)
# Create a table from schema
peopleSchemaRDD.registerTempTable("people")
val results = hiveContext.sql("SELECT * FROM people")
results.map(t => "Name: " + t.toString).collect().foreach(println)
# Save Table to ORCFile
peopleSchemaRDD.saveAsOrcFile("people.orc")
# Create Table from ORCFile
val morePeople = hiveContext.orcFile("people.orc")
morePeople.registerTempTable("morePeople")
hiveContext.sql("SELECT * from morePeople").collect.foreach(println)

Using the SparkSQL Thirft Server for JDBC/ODBC access

With this Tech Preview, SparkSQL’s thrift server provides JDBC access to SparkSQL.

1. Start the Thrift Server

From SPARK_HOME, start SparkSQL thirft server. Note the port value of the thrift JDBC server.
 ./sbin/start-thriftserver.sh --master yarn --executor-memory 512m --hiveconf hive.server2.thrift.port=10001

2. Connect to the Thrift Server over beeline

Launch beeline from SPARK_HOME:

./bin/beeline

3. Issue SQL commands

At the beeline prompt:

beeline>!connect jdbc:hive2://localhost:10001

You should see output similar to the following:

0: jdbc:hive2://localhost:10001> show tables;
Connected to: Spark SQL (version 1.2.0)
Driver: null (version null)
Transaction isolation: TRANSACTION_REPEATABLE_READ
+------------+
|   result   |
+------------+
| orc_table  |
| sample_07  |
| sample_08  |
| testtable  |
+------------+
4 rows selected (6.725 seconds)

Notes:

  • This example does not have security enabled, so any username and password combination should work.
  • The beeline connection might take 10 to 15 seconds to be available in the Sandbox environment, if show tables returns without any output, wait 10-15 seconds.

Step 3: Stop the Thrift Server

./sbin/stop-thriftserver.sh

Using the Spark Job History Server

The Spark Job History server is integrated with YARN’s Application Timeline Server (ATS). The Job History server publishes job metrics to ATS. This allows job details to be available after the job finishes. You can let the history server run while you run examples in the tech preview, and then go to the YARN resource manager page at http://sandbox.hortonworks.com:8088/cluster/apps to see the logs from the finished application.

1. Add History Services to SPARK_HOME/conf/spark-defaults.conf

spark.yarn.services                org.apache.spark.deploy.yarn.history.YarnHistoryService
spark.history.provider             org.apache.spark.deploy.yarn.history.YarnHistoryProvider
## Make sure the host and port match the node where your YARN history server is running
spark.yarn.historyServer.address   localhost:18080

2. Start the Spark History Server

./sbin/start-history-server.sh

3. Stop the Spark History Server

./sbin/stop-history-server.sh

Run SparkPI with Tez as execution engine

HDP 2.2 provides the option of running Spark DAGs with Tez as the execution engine. Please see this post for details about the benefits of this approach.

1. Copy tez-site to Hadoop conf dir

cp /etc/tez/conf/tez-site.xml /etc/hadoop/conf

2. Start SparkPI

./bin/spark-submit --class org.apache.spark.examples.SparkPi --master execution-context:org.apache.spark.tez.TezJobExecutionContext --conf update-classpath=true ./lib/spark-examples*.jar 3

The console will print output similar to the following. Note the value of Pi in bold at the end of the output.

…
14/12/23 19:47:48 INFO client.DAGClientImpl: DAG initialized: CurrentState=Running
14/12/23 19:47:50 INFO client.DAGClientImpl: DAG: State: RUNNING Progress: 0% TotalTasks: 3 Succeeded: 0 Running: 0 Failed: 0 Killed: 0
14/12/23 19:47:50 INFO client.DAGClientImpl:     VertexStatus: VertexName: 0 Progress: 0% TotalTasks: 3 Succeeded: 0 Running: 0 Failed: 0 Killed: 0
14/12/23 19:47:55 INFO client.DAGClientImpl: DAG: State: RUNNING Progress: 0% TotalTasks: 3 Succeeded: 0 Running: 0 Failed: 0 Killed: 0
14/12/23 19:47:55 INFO client.DAGClientImpl:     VertexStatus: VertexName: 0 Progress: 0% TotalTasks: 3 Succeeded: 0 Running: 0 Failed: 0 Killed: 0
14/12/23 19:48:00 INFO client.DAGClientImpl: DAG: State: RUNNING Progress: 0% TotalTasks: 3 Succeeded: 0 Running: 1 Failed: 0 Killed: 0
14/12/23 19:48:00 INFO client.DAGClientImpl:     VertexStatus: VertexName: 0 Progress: 0% TotalTasks: 3 Succeeded: 0 Running: 1 Failed: 0 Killed: 0
14/12/23 19:48:03 INFO client.DAGClientImpl: DAG: State: RUNNING Progress: 66.67% TotalTasks: 3 Succeeded: 2 Running: 1 Failed: 0 Killed: 0
14/12/23 19:48:03 INFO client.DAGClientImpl:     VertexStatus: VertexName: 0 Progress: 66.67% TotalTasks: 3 Succeeded: 2 Running: 1 Failed: 0 Killed: 0
14/12/23 19:48:03 INFO client.DAGClientImpl: DAG: State: SUCCEEDED Progress: 100% TotalTasks: 3 Succeeded: 3 Running: 0 Failed: 0 Killed: 0
14/12/23 19:48:03 INFO client.DAGClientImpl:     VertexStatus: VertexName: 0 Progress: 100% TotalTasks: 3 Succeeded: 3 Running: 0 Failed: 0 Killed: 0
14/12/23 19:48:03 INFO client.DAGClientImpl: DAG completed. FinalState=SUCCEEDED
14/12/23 19:48:03 INFO tez.DAGBuilder: DAG execution complete
Pi is roughly 3.1394933333333332

Running the Machine Learning Spark Application

Make sure all of your nodemanager nodes have the gfortran library installed. If not, you need to install it in all of your nodemanager nodes:

sudo yum install gcc-gfortran

Note: The library is usually available in the update repo for CentOS. For example:

sudo yum install gcc-gfortran --enablerepo=update

MLlib throws a linking error if it cannot detect these libraries automatically. For example, if you try to do Collaborative Filtering without the gfortran runtime library installed, you will see the following linking error:

java.lang.UnsatisfiedLinkError: 
org.jblas.NativeBlas.dposv(CII[DII[DII)I
    at org.jblas.NativeBlas.dposv(Native Method)
    at org.jblas.SimpleBlas.posv(SimpleBlas.java:369)
    at org.jblas.Solve.solvePositive(Solve.java:68)

Visit http://spark.apache.org/docs/latest/mllib-guide.html for Spark ML examples.

Troubleshooting

Issue:

Spark submit fails.

Note the error about failure to set the env:

Exception in thread "main" java.lang.Exception: When running with master 'yarn-cluster' either HADOOP_CONF_DIR or YARN_CONF_DIR must be set in the environment.
at org.apache.spark.deploy.SparkSubmitArguments.checkRequiredArguments(SparkSubmitArguments.scala:182)
…

Solution:
Set the environment variable YARN_CONF_DIR as follows:

export YARN_CONF_DIR=/etc/hadoop/conf

Issue:
A Spark-submitted job fails to run and appears to hang.

In the YARN container log you will notice the following error:

14/07/15 11:36:09 WARN YarnClusterScheduler: Initial job has not accepted any resources; check your cluster UI to ensure that workers are registered and have sufficient memory
14/07/15 11:36:24 WARN YarnClusterScheduler: Initial job has not accepted any resources; check your cluster UI to ensure that workers are registered and have sufficient memory
14/07/15 11:36:39 WARN YarnClusterScheduler: Initial job has not accepted any resources; check your cluster UI to ensure that workers are registered and have sufficient memory

Solution:
The Hadoop cluster needs sufficient memory for the request. For example, submitting the following job with 1GB memory allocated for executor and Spark driver fails with the above error in the HDP 2.2 Sandbox. Reduce the memory allocation for the executor and the Spark driver to 512 MB, and restart the cluster.

./bin/spark-submit --class org.apache.spark.examples.SparkPi    --master yarn-cluster  --num-executors 3 --driver-memory 512m  --executor-memory 512m   --executor-cores 1  lib/spark-examples*.jar 10

Issue:
Error message about HDFS non-existent InputPath when running Machine Learning examples:

org.apache.hadoop.mapred.InvalidInputException: Input path does not exist: 
hdfs://sandbox.hortonworks.com:8020/user/root/mllib/data/sample_svm_data.txt
      at 
org.apache.hadoop.mapred.FileInputFormat.singleThreadedListStatus(FileInputFormat.java:285)
      at org.apache.hadoop.mapred.FileInputFormat.listStatus(FileInputFormat.java:228)
      at org.apache.hadoop.mapred.FileInputFormat.getSplits(FileInputFormat.java:304)
      at org.apache.spark.rdd.HadoopRDD.getPartitions(HadoopRDD.scala:140)
      at org.apache.spark.rdd.RDD$$anonfun$partitions$2.apply(RDD.scala:207)
      at org.apache.spark.rdd.RDD$$anonfun$partitions$2.apply(RDD.scala:205)
      at scala.Option.getOrElse(Option.scala:120)
      at org.apache.spark.rdd.RDD.partitions(RDD.scala:205)
      at org.apache.spark.rdd.MappedRDD.getPartitions(MappedRDD.scala:28)
      at org.apache.spark.rdd.RDD$$anonfun$partitions$2.apply(RDD.scala:207)
… 
(Omitted for brevity.)

Solution:
Ensure that the input data is uploaded to HDFS.

Known Issues:

This tech preview does not work against a Kerberos enabled cluster

Additional Information:

Visit the forum for the latest discussions about issues:

http://hortonworks.com/community/forums/forum/spark/

Further Reading

Apache Spark documentation is available here:

https://spark.apache.org/docs/latest/

The post Using Apache Spark: Technical Preview with HDP 2.2 appeared first on Hortonworks.

HDFS Transparent Data Encryption

$
0
0

Many HDP users are increasing their focus on security within Hadoop and are looking for ways to encrypt their data.  Fortunately, Hadoop  provides  several options for encrypting data at rest. At the lowest level of encryption,  there is volume encryption that can encrypt all the data on a node and doesn’t require any changes to Hadoop. The volume-level encryption provides protection against physical security but lacks a fine-grained approach.

Often, you  want to encrypt only selected files/directories in HDFS to save on overhead and protect performance and now this is possible with HDFS Transparent Data Encryption (TDE). HDFS TDE allows users to take advantage of HDFS native data encryption without any application code changes.

Once an  HDFS admin sets up encryption, HDFS takes care of the  actual encryption/decryption without the end-user having to manually encrypt/decrypt a file.

The building blocks of this solution are:

  1. Encryption Zone: An HDFS admin creates an encryption zone and links it to an empty HDFS directory and an encryption key. Any files put in the directory are automatically encrypted by HDFS.
  2. Key Management Server (KMS): KMS is responsible for storing encryption key. KMS provides a REST API and access control on keys stored in the KMS.
  3. Key Provider API: The Key Provider API is the glue used by HDFS Name Node and Client to connect with the Key Management Server.

This guide covers:

  • Configuring the Key Management Server
  • Creating Encryption Zones
  • Reading/Writing Data in Encrypted File System

This technical preview takes advantage of the the HDP 2.2 Sandbox, and it is recommended that you do the same when you use this guide. If you have deployed an HDP 2.2 cluster that is Kerberized or non-Kerberized, this guide has additional sections that cover those deployment options as well.

Configure the Key Management Service (KMS)

Extract the Key Management Server bits from the package included in Apache Hadoop

# mkdir -p /usr/kms-demo
# cp /usr/hdp/current/hadoop-client/mapreduce.tar.gz /usr/kms-demo/
# export KMS_ROOT=/usr/kms-demo

Where KMS_ROOT refers to the directory where mapreduce.tar.gz has been extracted (/usr/kms-demo)

# cd $KMS_ROOT
# tar -xvf mapreduce.tar.gz

Start the Key Management Server

Appendix A covers advanced configuration of the Key Management Server. The following basic scenario uses the default configurations:

# cd $KMS_ROOT/hadoop/sbin/
# ./kms.sh run

You’ll see the following console output on a successful start: 

Jan 10, 2015 11:07:33 PM org.apache.catalina.startup.Catalina start
INFO: Server startup in 1764 ms

Configure Hadoop to use the KMS as the key provider

Hadoop configuration can be managed through either Ambari or through manipulating the XML configuration files. Both options are shown here.

Configure Hadoop to use KMS using Ambari

You can use Ambari to configure this in the HDFS configuration section.

Login in to Ambari through your web browser (admin/admin):

2015-01-28_17-26-562015-01-28_17-31-41_B


On the Ambari Dashboard, click HDFS service and then the “Configs” tab.


Screen Shot 2015-01-29 at 7.37.28 AMAdd the following custom properties for HADOOP key management and HDFS encryption zone feature to find the right KMS key provider:

  •       Custom core-site

Add property “hadoop.security.key.provider.path”  with value “kms://http@localhost:16000/kms” 

Screen Shot 2015-01-29 at 7.44_cropped

Note: Make sure to match the host of the node where you started KMS to the value in kms://http@localhost:16000/kms

  •       Custom hdfs-site

Add the property “dfs.encryption.key.provider.uri” with the value “kms://http@localhost:16000/kms”

Screen Shot 2015-01-29 at 12.09.15 PM

Make sure to match the host of the node where you started KMS to the value in kms://http@localhost:16000/kms

Save the configuration and restart HDFS after setting these properties.

Manually Configure Hadoop to use KMS using the XML configuration files

You can manually edit the site files in this section, if you are not using Ambari.

First edit your hdfs-site.xml file:

# cd /etc/hadoop/conf
# vi hdfs-site.xml

Add following entry in the hdfs-site.xml:

<property>
     <name>dfs.encryption.key.provider.uri</name>
     <value>kms://http@localhost:16000/kms</value>
|</property>

And edit the core-site.xml file as well.  

# cd /etc/hadoop/conf
# vi core-site.xml

Add following entry in the core-site.xml

<property>
      <name>hadoop.security.key.provider.path</name>
      <value>kms://http@localhost:16000/kms</value>
</property>

Create Encryption Keys

Log into the Sandbox as the hdfs superuser. Run the following commands to create a key named “key1″ with length of 256 and show the result:

# su - hdfs
# hadoop key create key1  -size 256
# hadoop key list -metadata

As an Admin, Create an Encryption Zone in HDFS

Run the following commands to create an encryption zone under /secureweblogs with zone key named “key1” and show the results: 

# hdfs dfs -mkdir /secureweblogs
# hdfs crypto -createZone -keyName key1 -path /secureweblogs
# hdfs crypto -listZones

Note: Crypto command requires the HDFS superuser privilege

As HDFS User, Reading and Writing Files From/To an Encryption Zone in HDFS

HDFS file encryption/decryption is transparent to its client. Users and applications can read/write files from/to an encryption zone as long they have the permission to access it. 

As an example, the ‘/secureweblogs’ directory in HDFS has been set up to be only read/write accessible by the ‘hive’ user:

# hdfs dfs -ls /
 …
drwxr-x---   - hive   hive            0 2015-01-11 23:12 /secureweblogs

The same directory ‘/secureweblogs’ is an encrypted zone in HDFS, you can verify that with HDFS superuser privilege.

 # hdfs crypto -listZones
/secureweblogs  key1

 As the ‘hive’ user, you can transparently write data to that directory.

[hive@sandbox ~]# hdfs dfs -copyFromLocal web.log /secureweblogs
[hive@sandbox ~]# hdfs dfs -ls /secureweblogs

Found 1 items

-rw-r--r--   1 hive hive       1310 2015-01-11 23:28 /secureweblogs/web.log

 As the ‘hive’ user, you can transparently read data from that directory, and verify that the exact file that was loaded into HDFS is readable in its unencrypted form.

[hive@sandbox ~]# hdfs dfs -copyToLocal /secureweblogs/web.log read.log
[hive@sandbox ~]# diff web.log read.log

 Other users will not be able to write data or read from the encrypted zone:

[root@sandbox ~]# hdfs dfs -copyFromLocal install.log /secureweblogs
copyFromLocal: Permission denied: user=root, access=EXECUTE, inode="/secureweblogs":hive:hive:drwxr-x---
[root@sandbox ~]# hdfs dfs -copyToLocal /secureweblogs/web.log read.log
copyToLocal: Permission denied: user=root, access=EXECUTE, inode="/secureweblogs":hive:hive:drwxr-x---

Appendices

A: HDFS TDE in a multi-node Hadoop Cluster

Extract Key Management bits to a node of your cluster, and make sure to use the FQDN of host of that node in your HDFS configuration for hadoop.security.key.provider.path & dfs.encryption.key.provider.uri.

B: HDFS TDE in a Kerberos Enabled Cluster

Step 1: Enable Kerberos for the Hadoop Cluster and validate that it is working

Step 2: Configure KMS to use Kerberos by adding the following configuration in $KMS_ROOT/hadoop/etc/hadoop/kms-site.xml :

<property>
     <name>hadoop.kms.authentication.type</name>
     <value>kerberos</value>
     <description> Authentication type for the KMS. Can be either &quot;simple&quot; or &quot;kerberos&quot;.</description>
</property>
<property>
     <name>hadoop.kms.authentication.kerberos.keytab</name>
     <value>/etc/security/keytabs/spnego.service.keytab</value>
     <description> Path to the keytab with credentials for the configured Kerberos principal.</description>
</property>
<property>
     <name>hadoop.kms.authentication.kerberos.principal</name>
     <value>HTTP/FQDN for KMS host@YOUR HADOOP REALM</value>
     <description> The Kerberos principal to use for the HTTP endpoint. The principal must start with 'HTTP/' as per the Kerberos HTTP SPNEGO specification.</description>
</property>

The value for hadoop.kms.authentication.kerberos.principal must be relevant for your environment. To get FQDN of your KMS host you can use the output of “hostname -f”

Step 3: Start KMS –

./hadoop/sbin/kms.sh run

C: Accessing Raw Bytes of an Encrypted File

HDFS provides access to the raw encrypted files. This enables the admin to move encrypted data.

There is a hidden namespace added under /.reserved/raw for distcp to access raw encrypted files to avoid unnecessary decrypt/encrypt overhead when copying encrypted files between clusters. It is accessible only for HDFS super user.

hdfs dfs -cat /.reserved/raw/zone1/localfile.dat
hdfs dfs -cat /.reserved/raw/secureweblogs/web.log

D: Error Creating Key when KeyProvider is not configured

hadoop key create key1 -size 256
“There are no valid KeyProviders configured. No key was created. You can use the -provider option to specify a provider to use.”

This error message will appear if you haven’t configured the 2 KMS related properties or have not restarted HDFS after this configuration.

E: Error putting file in Encrypted zone with Key Size of 256

An AES key of size 256 required unlimited strength JCE

F: Error Creating Key when KMS is not running

hadoop key create key2  -size 128
key2 has not been created. Connection refused
java.net.ConnectException: Connection refused
at java.net.PlainSocketImpl.socketConnect(Native Method)
at java.net.AbstractPlainSocketImpl.doConnect(AbstractPlainSocketImpl.java:339)
at java.net.AbstractPlainSocketImpl.connectToAddress(AbstractPlainSocketImpl.java:200)
at java.net.AbstractPlainSocketImpl.connect(AbstractPlainSocketImpl.java:182)
at java.net.SocksSocketImpl.connect(SocksSocketImpl.java:392)
at java.net.Socket.connect(Socket.java:579)
at sun.net.NetworkClient.doConnect(NetworkClient.java:175)

Solution: Start KMS server

cd $KMS_ROOT/hadoop/sbin
./kms.sh run

G: Error Starting KMS Server – 1

java.lang.ClassNotFoundException: javax.management.modelmbean.ModelMBeanNotificationBroadcaster not found

Make sure to set the JAVA_HOME to where JDK is on the node.

For example, export JAVA_HOME=/usr/jdk64/jdk1.7.0_67/

H: Error starting KSM Server – 2

SEVERE: Exception looking up UserDatabase under key UserDatabase

javax.naming.NamingException: /usr/kms-demo/hadoop/share/hadoop/kms/tomcat/conf/tomcat-users.xml (Permission denied)

Make sure to run the KMS as the user who as access to everything under  $KMS_ROOT, such as the root user.

I: Change the default password for KMS Keystore

 By default, KMS uses JCEKS and stores the keys in $USER_HOME/kms.keystore. The default config also does not use a password for this keystone. This is obviously not secure and should not be used in a production environment. We recommend that you set password for this file and configure KMS to use the password protected keystore.

Other Issues

Please post to Hortonworks Security Forum if you need help.

The post HDFS Transparent Data Encryption appeared first on Hortonworks.

Viewing all 31 articles
Browse latest View live