Quantcast
Channel: Hortonworks » Knowledgebase
Viewing all 31 articles
Browse latest View live

Checking the Health of HDFS Cluster

$
0
0

ISSUE

How do I check the health of my HDFS cluster (name node and all data nodes)?

SOLUTION

Hadoop includes the dfsadmin command line tool for HDFS administration functionality. This tool allows the user to view the status of the HDFS cluster.

To view a comprehensive status report, execute the following command:

hadoop dfsadmin -report

This command will output basic statistics of the cluster health. This includes the status of the namenode, status of each datanode, disk capacity amounts, block health statuses.

The same information can be found on the NameNode web status page – at http://<namenode IP>:50070/dfshealth.jsp

References:
http://hadoop.apache.org/common/docs/current/hdfs_user_guide.html#DFSAdmin+Command


Failure of Active NameNode in Hadoop Prior to HA

$
0
0

ISSUE:

Failure of Active Namenode in a non-HA deployment

SOLUTION:

The best approach to mitigating the risk of data loss due to a NameNode failure is to harden the NameNode system and components to meet the desired level of redundancy.

Since the journal is not flushed with every operation, it could be up to several seconds out of sync with the persisted disk state. This latency determines the scope of poential data loss, in the event of NameNode failure.

Having a highly fault tolerant NameNode system, mitigates the potential for data loss. In the future, when the NameNode is distributed, this latency will no longer be a concern and data loss scenarios become much less probable.

This level of fault tolerance and availability can be reached through various mechanism either hardware, software, or some combination.

Until NameNode HA (High Availability) becomes available, the current solution is to set up a secondary name node that will store a duplicate set of data.

When setting up the secondary namenode, consider whether it will assume the role of the NameNode in the case of NameNode failure, or simply as a means to replicate NameNode data.

If the secondary host will assume the role the of NameNode, then be sure no other services running on it would be impacted by an IP/FQDN change, as the failover NameNode must resolve to the same IP as the failed node. For more information on this, please see JIRA issue HDFS-34

Additionally its advisable to have the Hadoop NameNode binaries and supporting libraries, also mirrored onto the secondary NameNode. If the system has been architected to be fault tolerant, this should already be addressed. If not, these binaries and configuration would have to be duplicated prior to promoting the new node to NameNode.

The overall steps to manually switching to a new NameNode: (please see http://wiki.apache.org/hadoop/NameNodeFailover)

  1. Make a copy of the data before promoting the host to NameNode
  2. Change the IP address of the target, to the IP of the failed NameNode
  3. Ensure Hadoop is installed and configured identically to the original
  4. DO NOT FORMAT THIS NODE

At this point the new NameNode should begin processing the journal/logs and eventually after all nodes have reported their image / blocks, come up.


Install the Latest MySQL on a Linux Target

$
0
0

ISSUE:

hcat requires some sort of persistent db to store schema information

SOLUTION 1: Specific host access only

grab the latest package

> yum -y install mysql-server

configure autostart at boot

> chkconfig mysqld on
> service mysqld start

run the mysql client

> mysql -u root -p

enter your password

mysql> CREATE USER 'my_user_id'@'host' IDENTIFIED BY 'pw';
mysql> GRANT ALL PRIVILEGES ON *.* TO 'hcatre'@'host' WITH GRANT OPTION;
mysql> FLUSH PRIVILEGES;

exit the client

mysql> exit;

test the new account

mysql -h host_FQDN -u my_user_id -p

You should now be logged into the mysql client as the new user

If you get: Error … Can’t connect ot MySQL server on …

log into the mysql host and assume root

iptables -A INPUT -i eth0 -p tcp -m tcp --dport 3306 -j ACCEPT
service iptables save
service iptables restart

Test from hcat server machine

shell into the hcat server

mysql -h host -u my_user -p

*verify you can log in from the hcat host

Test from Hive

Run the Hive shell:

#hive --config /etc/hcatalog
hive> show tables;

Linux File Systems for HDFS

$
0
0

ISSUE:

Choosing the appropriate Linux file system for HDFS deployment

SOLUTION:

The Hadoop Distributed File System is platform independent and can function on top of any underlying file system and Operating System. Linux offers a variety of file system choices, each with caveats that have an impact on HDFS.

As a general best practice, if you are mounting disks solely for Hadoop data, disable ‘noatime’. This speeds up reads for files.

There are three Linux file system options that are popular to choose from:

  • Ext3
  • Ext4
  • XFS

Yahoo uses the ext3 file system for its Hadoop deployments. ext3 is also the default filesystem choice for many popular Linux OS flavours. Since HDFS on ext3 has been publicly tested on Yahoo’s cluster it makes for a safe choice for the underlying file system.

ext4 is the successor to ext3. ext4 has better performance with large files. ext4 also introduced delayed allocation of data, which adds a bit more risk with unplanned server outages while decreasing fragmentation and improving performance.

XFS offers better disk space utilization than ext3 and has much quicker disk formatting times than ext3. This means that it is quicker to get started with a data node using XFS.

Most often performance of a Hadoop cluster will not be constrained by disk speed – I/O and RAM limitations will be more important. ext3 has been extensively tested with Hadoop and is currently the stable option to go with. ext4 and xfs can be considered as well and they give some performance benefits.

References:

Optimal Way to Shut Down an HDP Slave Node

$
0
0

ISSUE

What is the optimal way to shut down a HDP slave node

SOLUTION

HDP slave nodes are usually configured to run the datanode and tasktracker processes. If HBase is installed, then the slave nodes run the HBase RegionServer process as well.

To shut down the slave node, it is important to shut down the slave processes first. Each process should be shut down by the respective user account. These are the commands to run:

Stop Hbase RegionServer:

su hbase - -c "hbase-daemon.sh --config /etc/hbase/ stop regionserver"

Stop tasktracker:

su mapred - -c "hadoop-daemon.sh --config /etc/hadoop/ stop tasktracker"

Stop datanode:

su hdfs - -c "hadoop-daemon.sh --config /etc/hadoop/ stop datanode"

Testing Hbase Setup

$
0
0

ISSUE

How do I test that Hbase is working properly? OR

What is a simple set of Hbase Commands?

SOLUTION

If HBase processes are not running, start them with the following commands:

To start the HBase master (‘sleep 25’ is included as the master takes some time to get up and running):

su hbase - -c "/usr/bin/hbase-daemon.sh --config /etc/hbase start master; sleep 25"

To start the HBase regioanserver:

su hbase - -c "/usr/bin/hbase-daemon.sh --config /etc/hbase start regionserver"

This command will describe a simple status of the HBase cluster nodes:

status 'simple'

This command will create a table with one column family:

create 'table2', 'cf1'

This command will add a row to the table:

put 'table2', 'row1', 'column1', 'value'

This command will display all rows in the table:

scan 'table2'

Testing HDFS Setup

$
0
0


ISSUE

How do I run simple Hadoop Distributed File System tasks? Or

How do I test the HDFS services are working?

SOLUTION

Make sure the name node and the data nodes are started.

To start the name node:

su hdfs - -c "hadoop-daemon.sh --config /etc/hadoop/ start namenode"

To start a data node:

su hdfs - -c "hadoop-daemon.sh --config /etc/hadoop start datanode"

Put data files into HDFS. This command will take a file from disk and put into HDFS:

su hdfs
hadoop fs -put trial_file.csv /user/hdfs/trial_file.csv

Read data from HDFS. This command will read the contents of a file from HDFS and display on the console:

su hdfs
hadoop fs -cat /user/hdfs/trial_file.csv

References:

http://hadoop.apache.org/common/docs/current/file_system_shell.html

Testing MapReduce Setup

$
0
0

ISSUE

How do I run an example map reduce job? Or

How do I test the map reduce services are working?

SOLUTION

Make sure the job tracker and the task trackers are started.

To start the job tracker:

su mapred - -c "hadoop-daemon.sh --config /etc/hadoop start jobtracker; sleep 25"

To start a task tracker:

su mapred - -c "hadoop-daemon.sh --config /etc/hadoop start tasktracker"

Run a map reduce job from the hadoop examples jar. This jar packages up a few example map reduce classes. The following command runs the sleep example with one mapper and one reducer:

hadoop jar /usr/share/hadoop/hadoop-examples-1.0.0.jar sleep -m 1 -r 1

The map reduce job will write outpts to the console. These outputs provide the job id that can be used to track the status of the job. The console output also displays the progress of the maps and reducers.


Using Apache Sqoop for Data Import from Relational DBs

$
0
0

ISSUE

How do I use Apache Sqoop for importing data from a relational DB?

SOLUTION

Apache Sqoop can be used to import data from any relational DB into HDFS, Hive or HBase.

To import data into HDFS, use the sqoop import command and specify the relational DB table and connection parameters:

sqoop import --connect <JDBC connection string> --table <tablename> --username <username> --password <password>

This will import the data and store it as a CSV file in a directory in HDFS.

To import data into Hive, use the sqoop import command and specify the option ‘hive-import’.

sqoop import --connect <JDBC connection string> --table <tablename> --username <username> --password <password> --hive-import

This will import the data into a Hive table with the approproate data types for each column.

Reference:

https://blogs.apache.org/sqoop/entry/apache_sqoop_overview

Working with Files in HCatalog Tables

$
0
0

ISSUE:

How can I use HCatalog to discover which files are associated with a partition in a table so that the files can be read directly from HDFS?

How do I place files in HDFS and then add them as a new partition to an existing table?

SOLUTION:

This document describes how to use HCatalog to discover which files are associated with a particular partition in a table so that those files can be read directly from HDFS, and how to place files in HDFS and then add them as a new partition to an existing table.

If you installed the code as tarballs, you will need to know the following before starting:

  • hadoop_home: location where Hadoop is installed on your client machine. For example, if you did an install under /home/hadoop/hdp10/hadoop then this will be your hadoop_home value.
  • hcat_home location where the HCatalog client is installed on your client machine. For example, if you did an install under /home/hadoop/hdp10/hcatalog then this will be your hcat_home value.
  • table_name the name of the table you wish to read from or write to.
  • templeton_host the hostname of the machine running Templeton, the web services API for HCatalog. This is only necessary if you are doing these calls via Templeton.
  • user_name the name of the user to run these commands as. This is only necessary if you are doing these calls via Templeton.

Throughout the document commands are detailed for both operations done on the command line and those done via web services. For those done on the command line, if the installation of the client was done as a tarball (rather than an rpm) it is assumed that your environment contains the variable HADOOP_HOME set to hadoop_home and that hcat_home/bin is in your shell’s PATH environment variable.

Reading

Step 1: Determine the schema of the table (Optional)

Command line:

hcat -e "describe <table_name>;"

This will return text that looks like:

OK
id bigint
user string
my_p string
my_q string

Values on the left are column names, values on the right are data types.

Web services:

URL: GET to <templeton_host>/templeton/v1/ddl/database/<db-name>/table/<table-name>
Accept: application/json
ContentType: application/json

Example JSON Response:

{ "columns": [
{
"name": "id",
"type": "bigint"
},
{
"name": "user",
"type": "string"
},
{
"name": "my_p",
"type": "string"
},
{
"name": "my_q",
"type": "string"
}
],
"database": "default",
"table": "my_table"
}

Step 2: Get a list of all partitions of the table (Optional)

Command line:

hcat -e "show partitions <table_name>;"

This will return text that looks like:

OK
ds=20110924
ds=20110925

Each line represents one partition, with the partition key to the left of the equal sign and the value for that partition to the right. If there are multiple partition keys they will be comma separated.

Web services:

URL: GET to <templeton_host>/templeton/v1/ddl/database/<db-name>/table/<table-name>/partition
Accept: application/json
ContentType: application/json

Example JSON response:

{
"partitions": [
{
"values": [
{
"columnName": "ds",
"columnValue": "20110924"
},
],
"name": "ds='20110924'"
},
{
"values": [
{
"columnName": "ds",
"columnValue": "20110925"
},
],
"name": "ds='20110925'"
},
],
"database": "default",
"table": "my_table"
}

Step 3: Find location information for the partition you wish to read.

Once you know the partition values for the partition you wish to read, you can find the location information. In the following statements part_col is the name of the partition column, part_value is the value of that column for the partition you are reading.

Command line:

hcat -e "show table extended like <table_name> partition(<part_col>=<part_value>);"

This will return text that looks like:

OK
tableName:studentparttab30k
owner:hortonal
location:hdfs://hrt9n03.cc1.ygridcore.net:9000/user/hcat/tests/data/studentparttab30k/studentparttab30k.20110924
inputformat:org.apache.hadoop.mapred.TextInputFormat
outputformat:org.apache.hadoop.hive.ql.io.HiveIgnoreKeyTextOutputFormat
columns:struct columns { string name, i32 age, double gpa}
partitioned:true
partitionColumns:struct partition_columns { string ds}
totalNumberFiles:1
totalFileSize:219190
maxFileSize:219190
minFileSize:219190
lastAccessTime:1328599687969
lastUpdateTime:1325806298324

You need the line starting with location:. This indicates the file or directory name where the partition data is stored. Depending on how the partition was created, this may be either a file or a directory.

Web services:

URL: GET to <templeton_host>/templeton/v1/ddl/database/<db-name>/table/<table-name>/partition/<partition-name>
Accept: application/json
ContentType: application/json

<partition-name> will be the name as given in the list of partitions obtained in Step 2. For example, for a table partitioned by the field ds where you wish to get the partition where ds=20110924, the name will be ds=’20110925′Note that the quotation marks will need to be escaped in your URL.

Example curl command:

curl -HContent-type:application/json 'http://www.myserver.com/templeton/v1/ddl/database/default/table/test_table/partition/ds=%2720110924%27'

Example JSON Response:

{
"minFileSize": 184,
"totalNumberFiles": 1,
"location": "hdfs://localhost:9000/user/hive/warehouse/my_table/my_p=XYZ/my_q=ABC",
"lastUpdateTime": 1329980827336,
"lastAccessTime": 1329980816220,
"columns": [
{
"name": "id",
"type": "bigint"
},
{
"name": "user",
"type": "string"
},
],
"partitionColumns": [
{
"name": "ds",
"type": "string"
},
],
"maxFileSize": 184,
"inputformat": "org.apache.hadoop.hive.ql.io.RCFileInputFormat"
"partitioned": true,
"owner": "you",
"totalFileSize": 184,
"outputformat": "org.apache.hadoop.hive.ql.io.RCFileOutputFormat",
"database": "default",
"table": "my_table",
"partition": "ds=’20110924’"
}

Step 4: Read the file

This can be done via hadoop fs, the Hadoop Java API, or webhdfs.

Writing

Step 1: Load the file you wish to have as a partition into HDFS

This can be done via hadoop fs, the Hadoop Java API, or webhdfs.

Step 2: Add the partition to the table

In the following statements part_col is the name of the partition column, part_value is the value of that column for the partition you are reading, and file_location is where you loaded the file in the previous step.

Command line:

hcat -e "alter table <table_name> add partition (<part_col>='<part_value>') location '<file_location>';"

Web services:

URL: PUT to <templeton_host>/templeton/v1/ddl/database/<db-name>/table/<table-name>/partition/<partition-name>
Accept: application/json
ContentType: application/json

<partition-name> will be the name of the partition. This should match Hive’s partition naming scheme of key=’value’. For example, for a table partitioned by the field ds where you wish to get the partition where ds=20110924, the name will be ds=’20110925′ Note that the quotation marks will need to be escaped in your URL.

The location is passed in a JSON document:

{
“location”: “<location>”
}

Example curl command:

curl -X PUT -HContent-type:application/json -d '{"location": "hdfs://nn.acme.com/user/data/mytable/20110924"}' 'http://www.myserver.com/templeton/v1/ddl/database/default/table/test_table/partition/ds=%2720110924%27'

Example JSON Response:

{
"return-code" : “OK”
}

Full JSON Schema for document

{
"partition": "ds='20110924'",
"table": "mytable",
"database": "default"
}

Big Data Defined

$
0
0

Big Data is defined in terms of transformative economics. A Big Data system has four properties:

  • It uses local storage to be fast but inexpensive
  • It uses clusters of commodity hardware to be inexpensive
  • It uses free software to be inexpensive
  • It is open source to avoid expensive vendor lock-in

Cheap storage means logging enormous volumes of data to many disks is easy. Processing this data is less so. Distributed systems which have the above four properties are disruptive because they are approximately 100 times cheaper than other systems for processing large volumes of data, and because they deliver high I/O performance for the buck.

Apache Hadoop is one such system. Hadoop ties together a cluster of commodity machines with local storage using free and open source software to store and process vast amounts of data at a fraction of the cost of any other system.

SAN Storage NAS Filers Local Storage
$2-10/GB $1-5/GB $0.05/GB

It is out of this cost differential that our opportunity arises: to log every shred of data we can in the cheapest place possible. To provide access to this data across the organization. To mine our data for value. This is Big Data.

The post Big Data Defined appeared first on Hortonworks.

Hadoop Distributed File System (HDFS) Defined

$
0
0

The best place for a deep dive into HDFS is the HDFS Architecture page. Here we’ll take an abbreviated view of what HDFS is, and why it matters.

The Hadoop Distributed File System is the backbone of a Hadoop cluster. It provides redundant, high available, high I/O performance for Hadoop MapReduce. It works like this: A hadoop cluster is a collection of normal, commodity servers with 8-12 disks each, connected together by ethernet. Large files are stored on HDFS in blocks of at least 64MB (and often as large as 1TB), and they are replicated three times across different machines. When a file is read, one of the three machines storing that block(s) of data streams entire the entire block from disk sequentially through the program reading the data. This results in very high I/O performance, meaning that HDFS dramatically outperforms SAN and NAS systems in terms of streaming I/O.

Once files are stored in HDFS, they are carefully minded by the namenode. The namenode(s) are the head of HDFS – they map which blocks match to which files. If one of the three machines holding a given block goes down with a hardware failure or disk corruption, the data from the remaining two nodes will automatically be copied to a new third node. HDFS is therefore self-healing.

When data is being read by Hadoop MapReduce, triple-replication is again helpful – the namenode will try above all else to keep data reads and transfers ‘local’ to the three nodes where a given block of data is stored. Furthermore, if reading one block is taking a long time – another read on another copy of the data will be started, and the winner is whichever reads first. This is called speculative execution.

These features of HDFS are what enable Hadoop to be reliable, and for MapReduce to work at all!

The post Hadoop Distributed File System (HDFS) Defined appeared first on Hortonworks.

Hadoop MapReduce Defined

$
0
0

Hadoop MapReduce is the way Hadoop processes data. MapReduce uses the Hadoop Distributed File System to handle the distribution of data on the cluster. MapReduce is how Hadoop parallelizes its operations, with many concurrent Mapper and Reducer processes running on many different machines. Mappers scan data from HDFS in a massively parallel fashion. They emit a key and a piece of data. Reducers group data from Mappers upon this key together for processing.

That is MapReduce in its entirety. It is a simple framework for computing that turns out to generalize well to many kinds of operations like JOINs, sorts, etc.

Because of tools like Pig and Hive, you don’t need to think in terms of MapReduce or to program in MapReduce to use Hadoop. But if you wonder how things operate under the covers… it is all Map (read the data, emit a key and a value), Reduce (group all values per key, perform another operation). And be aware… the most common use of data from a mapreduce job is to feed it into another mapreduce job. You don’t have to get it right in one operation!

The post Hadoop MapReduce Defined appeared first on Hortonworks.

HOWTO: Install the Latest MySQL on a Linux Target

$
0
0

ISSUE:

hcat requires some sort of persistent db to store schema information

SOLUTION 1: Specific host access only

grab the latest package

> yum -y install mysql-server

configure autostart at boot

> chkconfig mysqld on
> service mysqld start

run the mysql client

> mysql -u root -p

enter your password

mysql> CREATE USER 'my_user_id'@'host' IDENTIFIED BY 'pw';
mysql> GRANT ALL PRIVILEGES ON *.* TO 'hcatre'@'host' WITH GRANT OPTION;
mysql> FLUSH PRIVILEGES;

exit the client

mysql> exit;

test the new account

mysql -h host_FQDN -u my_user_id -p

You should now be logged into the mysql client as the new user

If you get: Error … Can’t connect ot MySQL server on …

log into the mysql host and assume root

iptables -A INPUT -i eth0 -p tcp -m tcp --dport 3306 -j ACCEPT
service iptables save
service iptables restart

Test from hcat server machine

shell into the hcat server

mysql -h host -u my_user -p

*verify you can log in from the hcat host

Test from Hive

Run the Hive shell:

#hive --config /etc/hcatalog
hive> show tables;

The post HOWTO: Install the Latest MySQL on a Linux Target appeared first on Hortonworks.

HOWTO: Ambari on EC2

$
0
0

This document is an informal guide to setting up a test cluster on Amazon AWS, specifically the EC2 service. This is not a best practice guide nor is it suitable for a full PoC or production install of HDP.

Please refer to Hortonworks documentation online to get a complete set of documentation.

Create Instances

Created the following RHEL 6.3 64bit instances:

  • m1.medium ambarimaster
  • m1.large hdpmaster1
  • m1.large hdpmaster2
  • m1.medium hdpslave1
  • m1.medium hdpslave2
  • m1.medium hdpslave3

Note: when instantiating instances, I increased the root partition to 100Gb on each of them. For long term use, you may want to create separate volumes for your each of the datanodes to store larger amounts of data. Typical raw storage per node is 12-24Tb per slave node.

Note: I edit the Name column in the EC2 Instances screen to the names mentioned above so I know which box I’m dealing with

Configure Security Groups

Used the following security group rules:

ICMP
Port (Service) Source Action
ALL sg-79c54511 (hadoop) Delete
TCP
Port (Service) Source Action
0 – 65535 sg-79c54511 (hadoop) Delete
22 (SSH) 0.0.0.0/0 Delete
80 (HTTP) 0.0.0.0/0 Delete
7180 0.0.0.0/0 Delete
8080 (HTTP*) 0.0.0.0/0 Delete
50000 – 50100 0.0.0.0/0 Delete
UDP
Port (Service) Source Action
0 – 65535 sg-79c54511 (hadoop) Delete

Configure Nodes

On each and every node (using root):


vim /etc/sysconfig/selinux (set SELINUX=disabled)
vim /etc/sysconfig/network (set HOSTNAME=<chosen_name>.hdp.hadoop where <chosen_name> is one of the following: ambarimaster, hdpmaster1, hdpmaster2, hdpslave1, hdpslave2, hdpslave3 – depending on what EC2 instance you are on)
chkconfig iptables off
chkconfig ip6tables off
shutdown -r now #(only after the commands above are completed)

Note: when I do a restart of the node in this manner, my external EC2 names did NOT change. They will change if you actually halt the instance. This is separate concern from the internal IP addresses which we will get to further on in these instructions

Note: SSH on the RHEL instances has a time out. If your session hangs just give it a few seconds and you will get a “Write failed: Broken pipe” message; just reconnect the box and everything will be fine. Change the SSH timeout if you desire.

Key Exchange

Logged onto the ambarimaster ONLY: ssh-keygen -t rsa

On your local box (assuming a linux/mac laptop/workstation, if not use Cygwin, WinSCP, FileZilla, etc to accomplish the equivalent secure copy):

scp -i amuisekey.pem root@ec2-54-234-94-128.compute-1.amazonaws.com:/root/.ssh/id_rsa.pub ./
scp -i amuisekey.pem root@ec2-54-234-94-128.compute-1.amazonaws.com:/root/.ssh/id_rsa ./

Once you have your public and private key on your local box, you can distribute the public key to each node. Do this for every host except for the ambarimaster:

scp -i amuisekey.pem ./id_rsa.pub root@ec2-174-129-186-149.compute-1.amazonaws.com:/root/.ssh/

Log on to each host copy the public key for ambarimaster into each server’s authorized_key file:

cat id_rsa.pub >> authorized_keys

To confirm the passwordless ssh is working:

  1. Pick a host other than ambarimaster and determine the internal IP and keep it handy: ifconfig -a
  2. Log on to your ambarimaster and test passwordless ssh using the IP of the host you had just looked up: ssh root@10.110.35.23
  3. Confirm that you did actually land on the right host by checking the name: hostname
  4. Make sure you exit out of your remote session to your child node from the ambarimaster or things could get confusing very fast

Setup Hosts

Log on to the ambarimaster and edit the hosts:

  • On each host, check the internal ip with: ifconfig -a
  • Edit the hosts file on your ambarimaster: vim /etc/hosts
  • Edit the hosts file to look the one below, taking into account your own IP addresses for each host:
127.0.0.1 localhost.localdomain localhost
::1 localhost6.localdomain6 localhost6
10.110.35.23 hdpmaster1.hdp.hadoop hdpmaster1
10.191.45.41 hdpmaster2.hdp.hadoop hdpmaster2
10.151.94.30 hdpslave1.hdp.hadoop hdpslave1
10.151.87.239 hdpslave2.hdp.hadoop hdpslave2
10.70.78.233 hdpslave3.hdp.hadoop hdpslave3
10.151.22.30 ambarimaster.hdp.hadoop ambarimaster
  • Finally, copy the /etc/hosts file from the ambarimaster to every other node:
    scp /etc/hosts root@hdpmaster1:/etc/hosts
    scp /etc/hosts root@hdpmaster2:/etc/hosts
    scp /etc/hosts root@hdpslave1:/etc/hosts
    scp /etc/hosts root@hdpslave2:/etc/hosts
    scp /etc/hosts root@hdpslave3:/etc/hosts

Note: the /etc/hosts is the file you will need to change if you shut down your EC2 instance and get a new internal IP. When you update this file you must make sure that all nodes have the same copy.

YUM Install

On the ambarimaster only, install the HDP yum repository:

cd
wget http://public-repo-1.hortonworks.com/ambari/centos6/1.x/GA/ambari.repo
cp ambari.repo /etc/yum.repos.d
yum install epel-release
yum repolist
Install and initialize the ambari server:
yum install ambari-server
ambari-server setup
ambari-server start

Now you can logon to Ambari. Make a note of the external hostname of your ambarimaster EC instance in the AWS console and go to: http://:8080 using your local host’s favorite web browser

Log on to Ambari with admin/admin

Using Ambari to Install

Going through the Ambari cluster install process:

Name your cluster whatever you want

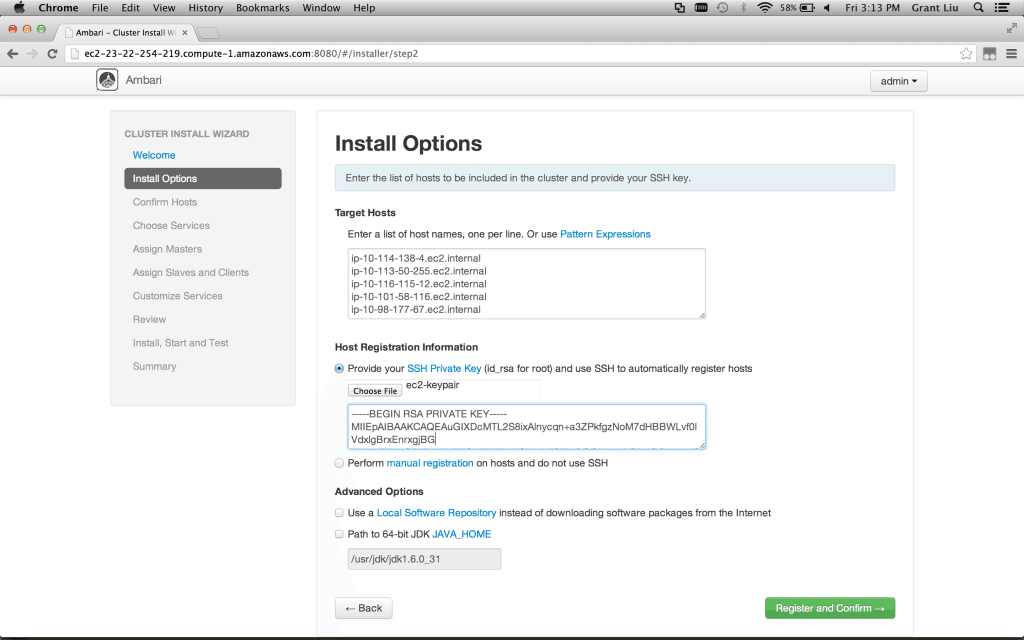
Install Options::Target Hosts – on each line enter the fully qualified hostnames as below (do not add our ambarimaster to the list):
hdpmaster1.hdp.hadoophdpmaster2.hdp.hadoophdpslave1.hdp.hadoophdpslave2.hdp.hadoophdpslave3.hdp.hadoop

Install Options::Host Registration Information – Find the id_rsa (private key) file you downloaded from ambarimaster when you were setting up. Click on choose file and select this file.

Install Options::Advanced Options – leave these as default

Click Register and Confirm

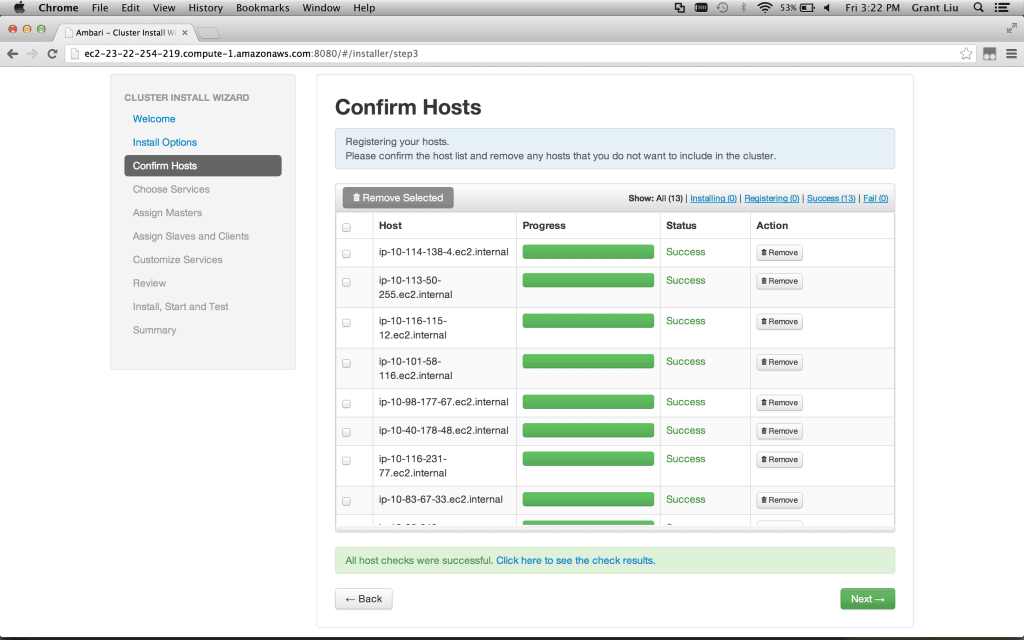
Confirm Hosts – Wait for the ambari agents to be installed and registered on each of your nodes and click next when all have been marked success. Note that you can always add nodes at a later time, but make sure you have your two masters and at least 1 slave.

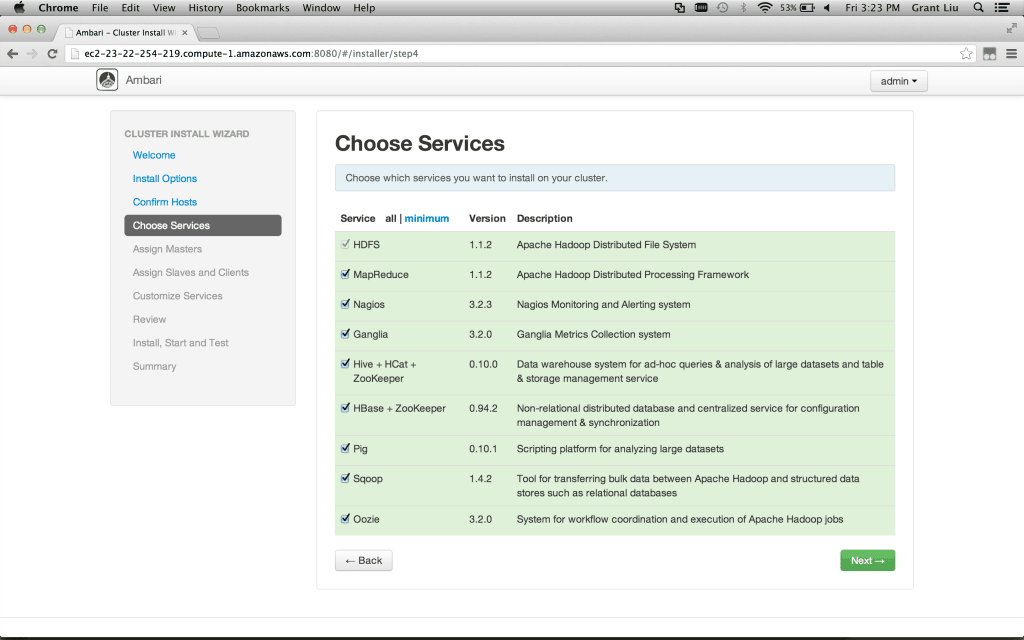
Choose Services – By default all services are selected. Note that you cannot go back and reinstall services later in this version of Ambari so choose what you want now.

Assign Masters – Likely the default is fine, but see below for a good setup. Note that one of the slaves will need to be a ZooKeeper instance to have an odd number for quorum.

hdpmaster1: NameNode, NagiosServer, GangliaCollector, HBaseMaster, ZooKeeper
hdpmaster2: SNameNode, JobTracker, HiveServer2, HiveMetastore, WebHCatServer, OozieServer, ZooKeeper
hdpslave1: ZooKeeper

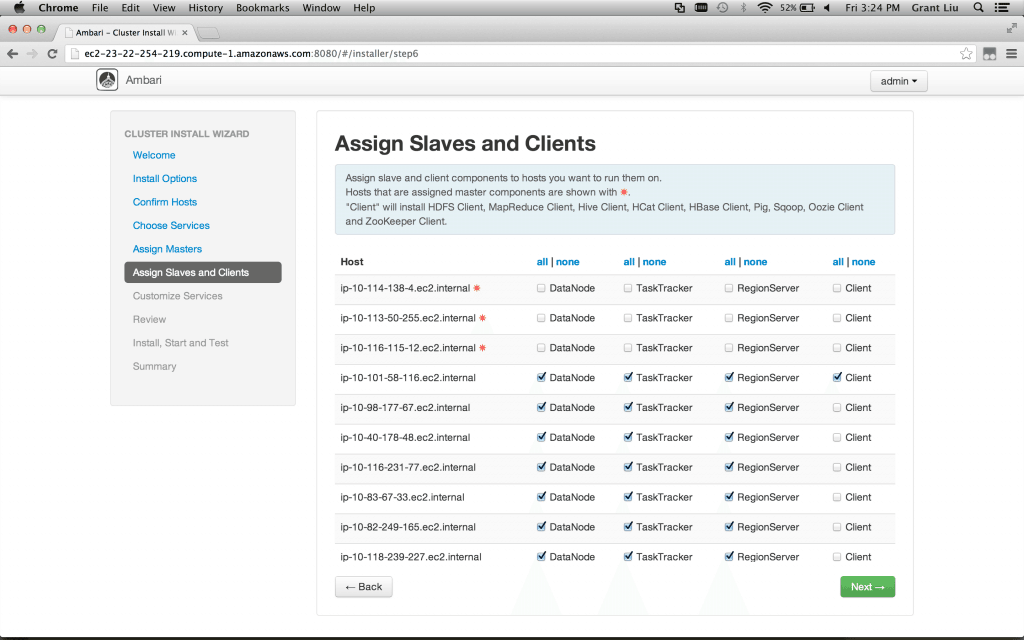
Assign Slaves and Clients – For a demo cluster it is fine to have all of the boxes run datanode, tasktracker, regionserver, and client libraries. If you want to expand this cluster with many more slave nodes then I would suggest only running the datanode, tasktracker, and regionserver roles to the hdpslave nodes. The clients can be installed where you like but be sure at least one or two boxes have a client role. Click Next after you are done.

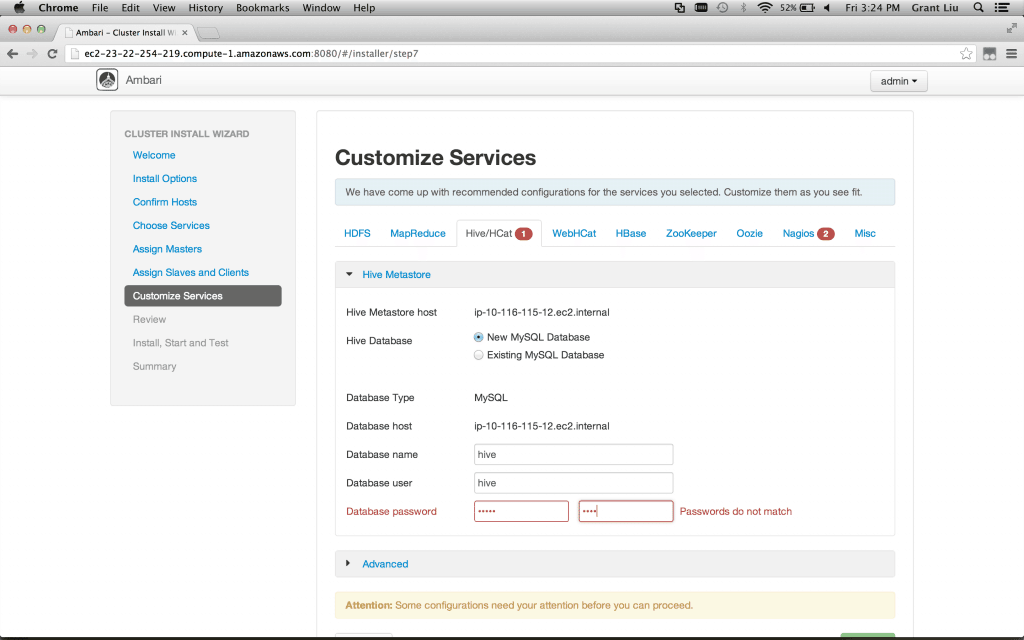
Customize Services – You will note that two services have red markers next to their name: Hive/HCat and Nagios.

Select Hive/HCat and choose your password for hive user on the MySQL database (this stores metadata only); remember the password.

Select Nagios and choose your admin password. Setup your Hadoop admin email to your email (or the email of someone you don’t like very much) and you can experience Hadoop alerts from your cluster! Wow.

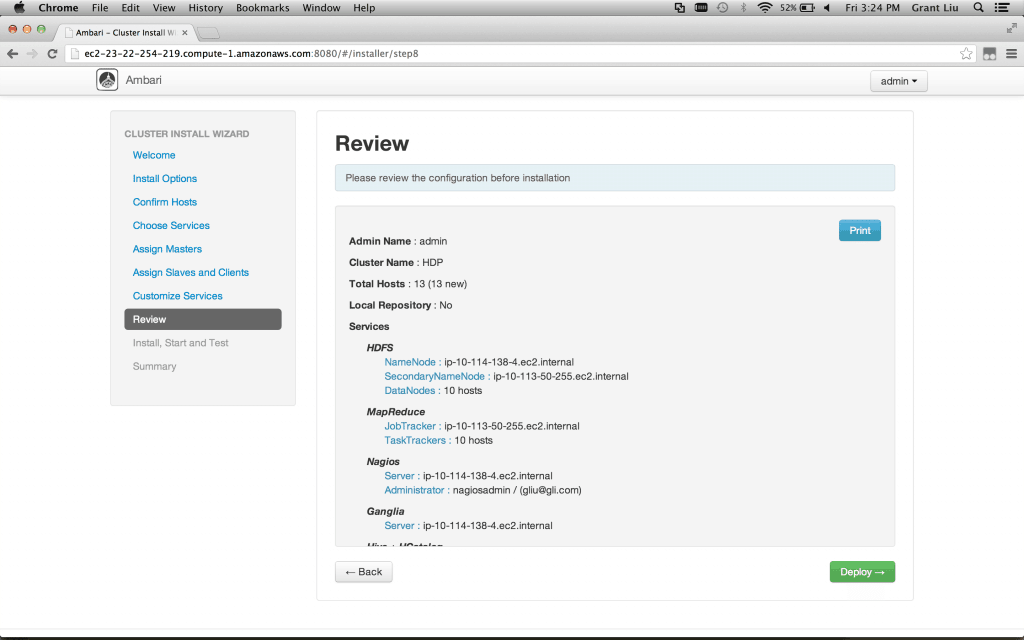
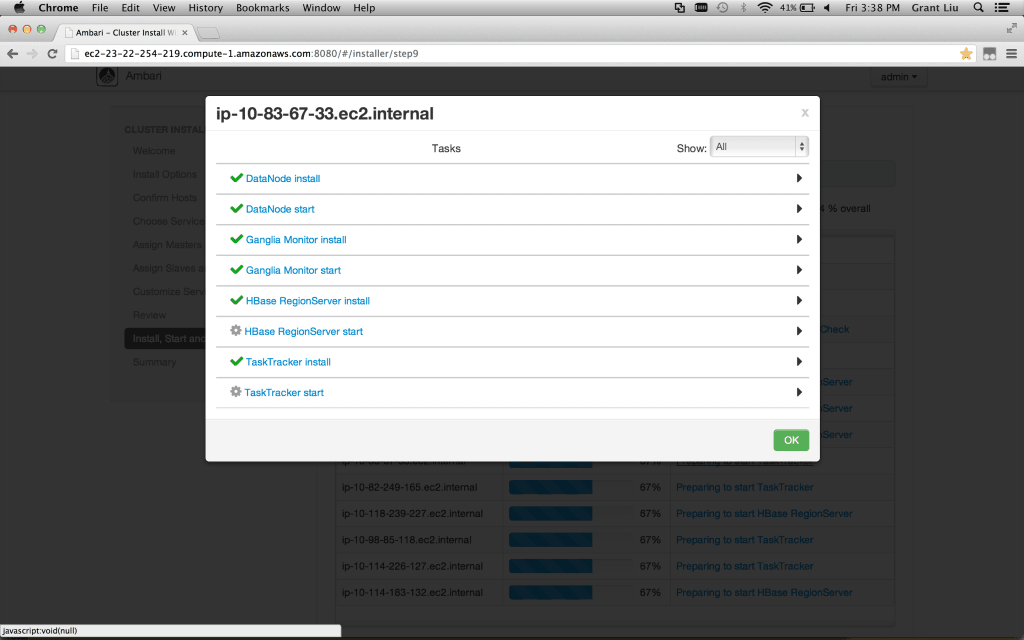
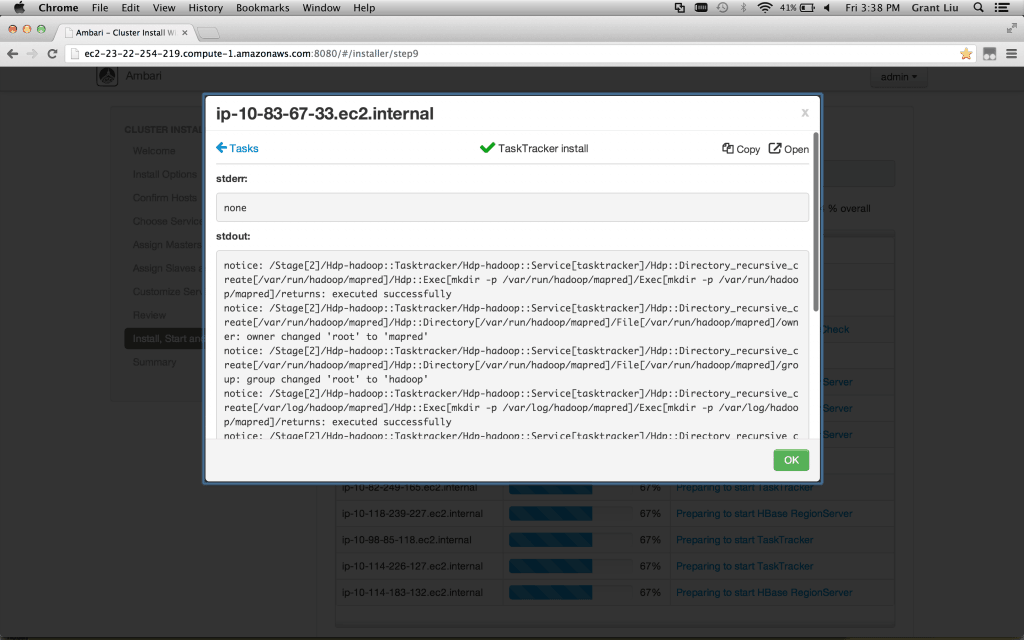
Review – Take note of the Print command in the top corner. I usually save this to a pdf. Then click Deploy. Get a coffee.

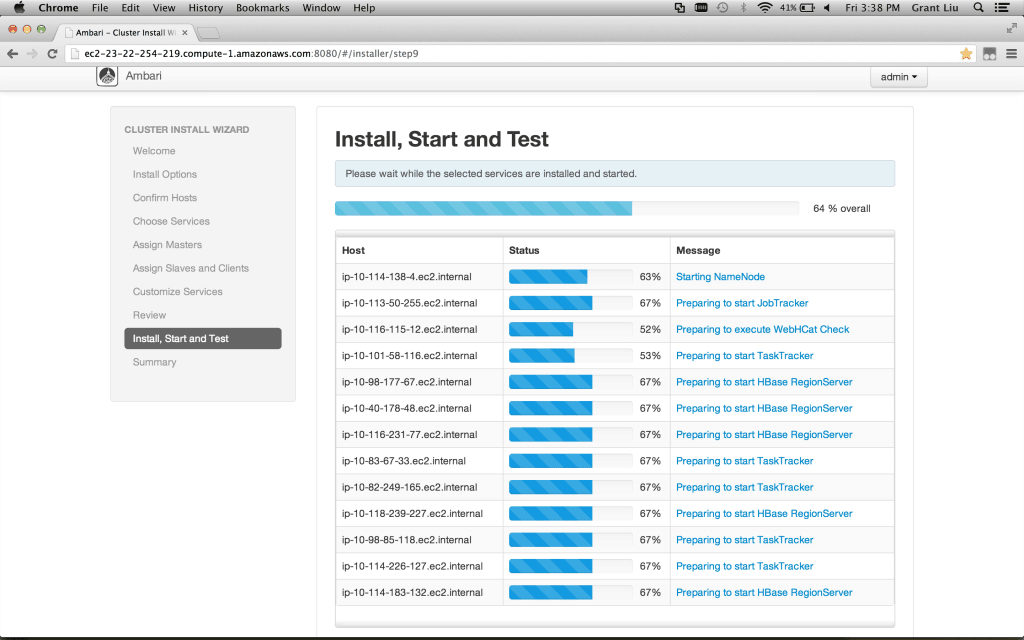
Note: you may need to refresh the web page if the installer appears stuck (this happens very occasionally depending on various browser/network situations)

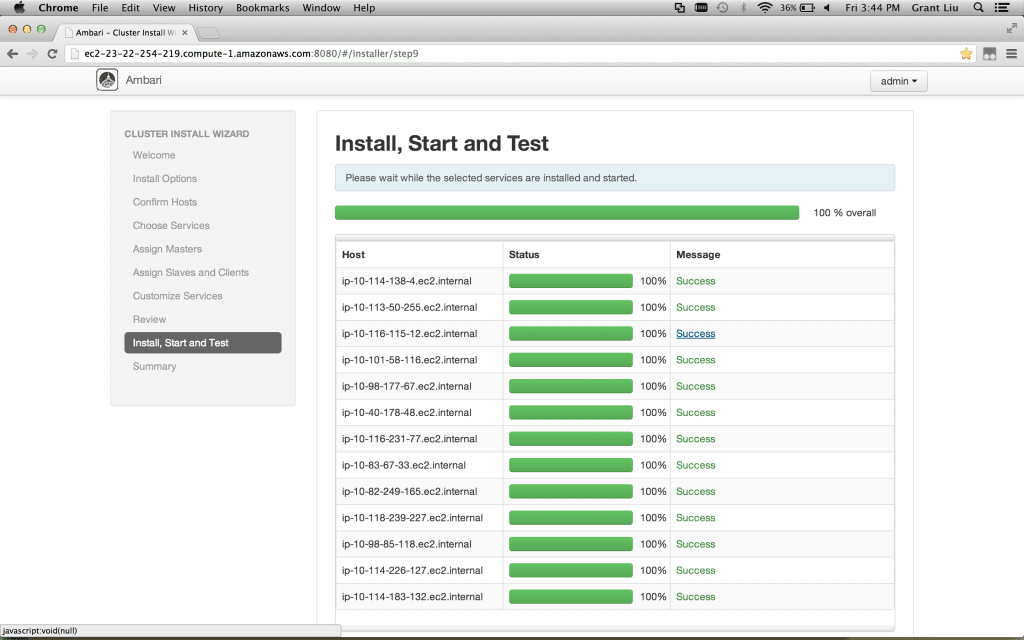
Verify 100% installed and click Next

Summary – You should see that all of the Master services were installed successfully and none should have failed. Click Complete.

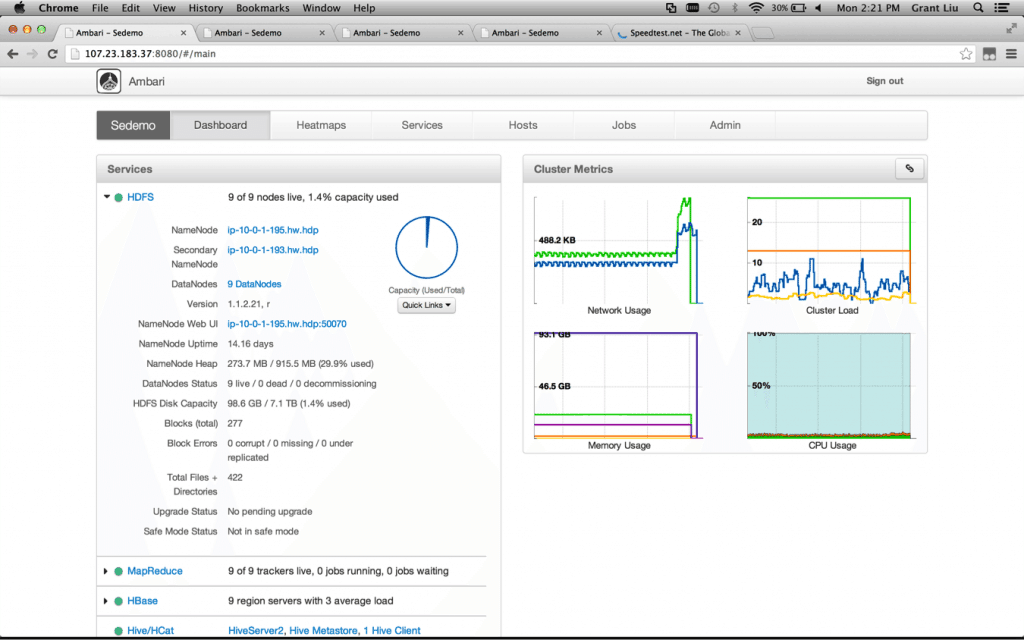
At this point the Ambari installation and the HDP Cluster is complete so you should see the Ambari Dashboard.

You can leave your cluster running as long as you want but be warned that the instances and volumes will cost you on AWS. To ensure that you will not be charged you can terminate (not just stop) your instances and delete your volumes in AWS. I encourage you to keep them for a a week or so as you decide how to setup your actual Hadoop PoC cluster (be it on actual hardware, Virtual Machines, or another cloud solution). The instances you created will be handy for reference as you install your next cluster and generally are low cost. Consult AWS documentation for details on management and pricing. Please look into Rackspace as well.

Relevant Links

HDP Documentation:
http://docs.hortonworks.com/

AWS Instructions for using Putty with Linux EC2 instances:
http://docs.aws.amazon.com/AWSEC2/latest/UserGuide/putty.html

AWS Discussion of Static IPs:
https://forums.aws.amazon.com/thread.jspa?threadID=71177

Adding a new drive to RHEL 6 (Relevant for adding volumes for Datanode storage):
http://www.techotopia.com/index.php/Adding_a_New_Disk_Drive_to_an_RHEL_6_System

Toronto Hadoop User Group:
http://www.meetup.com/TorontoHUG/

Some more details on this process with Amazon EC2 and Cygwin:
http://pthakkar.com/2013/03/installing-hadoop-apache-ambari-amazon-ec2/

The post HOWTO: Ambari on EC2 appeared first on Hortonworks.


Get Started: Ambari for provisioning, managing and monitoring Hadoop

$
0
0

Ambari is 100% open source and included in HDP, greatly simplifying installation and initial configuration of Hadoop clusters. In this article we’ll be running through some installation steps to get started with Ambari. Most of the steps here are covered in the main HDP documentation here.

The first order of business is getting Ambari Server itself installed. There are different approaches to this, but for the purposes of this short tour, we’ll assume Ambari is already installed on its own dedicated node somewhere or on one of the nodes on the (future) cluster itself. Instructions can be found under the installation steps linked above. Once Ambari Server is running, the hard work is actually done. Ambari  simplifies cluster install and initial configuration with a wizard interface, taking care of it with but a few clicks and decisions from the end user. Hit http://<server_you_installed_ambari>:8080 and log in with admin/admin. Upon logging in, we are greeted with a user-friendly, wizard interface. Welcome to Apache Ambari! Name that cluster and let’s get going.

Screen Shot 2013-03-29 at 3.12.16 PM

Now we can target hosts for installation with a full listing of host names or regular expressions (in situations when there are many nodes with similar names):

Screen Shot 2013-03-29 at 3.13.20 PM

The next step is node registration, with Ambari doing all of the heavy lifting for us. An interface to track progress and drill down into log files is made available:

Screen Shot 2013-03-29 at 3.22.53 PM

Upon registration completion, a detailed view of host checks run and options to re-run are also available:

Screen Shot 2013-03-29 at 3.22.57 PM

Next, we select which high level components we want for the cluster. Dependency checks are all built in, so no worries about knowing which services are pre-requisites for others:

Screen Shot 2013-03-29 at 3.23.26 PM

After service selection, node-specific service assignments are as simple as checking boxes:

Screen Shot 2013-03-29 at 3.24.00 PM

This is where some minor typing may be required. Ambari allows simple configuration of the cluster via an easy to use interface, calling out required fields when necessary:

Screen Shot 2013-03-29 at 3.24.24 PM

Once configuration has been completed, a review pane is displayed. This is a good point to pause and check for anything that requires adjustment. The Ambari wizard makes that simple. Things look fabulous here, though, so onwards!

Screen Shot 2013-03-29 at 3.24.40 PM

Ambari will now execute the actual installation and necessary smoke tests on all nodes in the cluster. Sit back and relax, Ambari will perform the heavy lifting yet again:

Screen Shot 2013-03-29 at 3.38.15 PM

If you are itching to get involved, detailed drill-downs are available to monitor progress:

Screen Shot 2013-03-29 at 3.38.18 PM


Screen Shot 2013-03-29 at 3.38.23 PM

Ambari tracks all progress and activities for you, dynamically updating the interface:

Screen Shot 2013-03-29 at 3.44.45 PM

And just like that, we have our Hortonworks Data Platform Cluster up and running, ready for that high priority POC:

final

Go forth and prosper, my friends. May the (big) data be with you.

The post Get Started: Ambari for provisioning, managing and monitoring Hadoop appeared first on Hortonworks.

How To: Install and Configure the Hortonworks ODBC driver on Mac OSX

$
0
0

This document describes how to install and configure the Hortonworks ODBC driver on Mac OS X. After you install and configure the ODBC driver, you will be able to access Hortonworks sandbox data using Excel.

Click here to view/download the document.

In this procedure, we will use Microsoft Excel 2011 to access Hortonworks sandbox data. You should also be able to access sandbox data using other versions of Excel. The process may not be identical in other versions of Excel, but it should be similar.

Prerequisites

  • Mac running OS X
  • Hortonworks Sandbox 1.2 (installed and running)
  • Excel 2011

Overview

To install and configure the Hortonworks ODBC driver on Mac OS X:

  1. Download and install the Hortonworks ODBC driver for Mac OS X.
  2. Download and install the iODBC Driver Manager for Mac OS X.
  3. Configure the Hortonworks ODBC driver
  4. Open Excel and test the connection to the Hortonworks sandbox.

The post How To: Install and Configure the Hortonworks ODBC driver on Mac OSX appeared first on Hortonworks.

How To: Install and Configure the Hortonworks ODBC driver on Windows 7

$
0
0

This document describes how to install and configure the Hortonworks ODBC driver on Windows 7. After you install and configure the ODBC driver, you will be able to access Hortonworks sandbox data using Excel.

Click here to view/download the document.

The Hortonworks ODBC driver enables you to access data in the Hortonworks Data Platform from Business Intelligence (BI) applications such as Microsoft Excel, Tableau, Click View, Micro Strategy, Cognos, and Business Objects.

Prerequisites:

  • Windows 7
  • Hortonworks Sandbox 1.2 (installed and running)

 Overview

The Hortonworks ODBC driver installation consists of the following steps:

  1. Download and install the Hortonworks ODBC driver.
  2. Configure the ODBC connection in Windows 7.

The post How To: Install and Configure the Hortonworks ODBC driver on Windows 7 appeared first on Hortonworks.

HOWTO: Optimal Way to Shut Down an HDP Slave Node

$
0
0

ISSUE

What is the optimal way to shut down a HDP slave node

SOLUTION

HDP slave nodes are usually configured to run the datanode and tasktracker processes. If HBase is installed, then the slave nodes run the HBase RegionServer process as well.

To shut down the slave node, it is important to shut down the slave processes first. Each process should be shut down by the respective user account. These are the commands to run:

Stop Hbase RegionServer:

su hbase - -c "hbase-daemon.sh --config /etc/hbase/ stop regionserver"

Stop tasktracker:

su mapred - -c "hadoop-daemon.sh --config /etc/hadoop/ stop tasktracker"

Stop datanode:

su hdfs - -c "hadoop-daemon.sh --config /etc/hadoop/ stop datanode"

The post HOWTO: Optimal Way to Shut Down an HDP Slave Node appeared first on Hortonworks.

HOWTO Test Hbase Setup

$
0
0

ISSUE

How do I test that Hbase is working properly? OR

What is a simple set of Hbase Commands?

SOLUTION

If HBase processes are not running, start them with the following commands:

To start the HBase master (‘sleep 25’ is included as the master takes some time to get up and running):

su hbase - -c "/usr/bin/hbase-daemon.sh --config /etc/hbase start master; sleep 25"

To start the HBase regioanserver:

su hbase - -c "/usr/bin/hbase-daemon.sh --config /etc/hbase start regionserver"

This command will describe a simple status of the HBase cluster nodes:

status 'simple'

This command will create a table with one column family:

create 'table2', 'cf1'

This command will add a row to the table:

put 'table2', 'row1', 'column1', 'value'

This command will display all rows in the table:

scan 'table2'

The post HOWTO Test Hbase Setup appeared first on Hortonworks.

Viewing all 31 articles
Browse latest View live